53 degrees early morning, 56 when I got out back, 64 when I left at noon. high and bright pebbly clouds in almost complete cover, though some blue shown between the pebbles. A nice breeze strong enough to move a little bit of sawdust and take the heat away from you if you are not bundled. Tomorrow morning it is supposed to be even colder. This weather report is brought to you by the city of Pompano Beach department of tourism.
Tuesday is the 17th. This weekend is the twelfth anniversary of my starting in wood working. Before then, I would go to Mom's house with my laptop computer and write. I would also sit at the kitchen table and make buildings for my model railroad.
For a year or two, my dad kept asking me to learn carving. I had no interest. One day it dawned on me that my dad was in his 80s. I decided I did not want that "I wish I had said, I wish I had done," feeling after his passing. On the 17th, I borrowed one of his knives, and took a piece of wood (I think it was shaped to make shingles for bird houses).
I remember when he was learning carving, he had difficulty in getting out of the square of the wood. He was afraid to dig into the wood for fear of making a mistake. He essentially surface carved the wood on all sides. By this time, though, he was doing good carvings.
I was determined not to make the mistakes he was making, and I dug deep into the wood. I gave my character a big nose and cut in for the neck and body. He was supposed to have a brim going all the way around his head, but it kept breaking off. It ended up being more like a flat topped ball cap. When I was done, it looked like a french Foreign legion soldier.
My next two carvings were from boards. I know one was a sailor, but I will have to check tomorrow what the other one was. I am thinking like a cowboy, but am not sure.
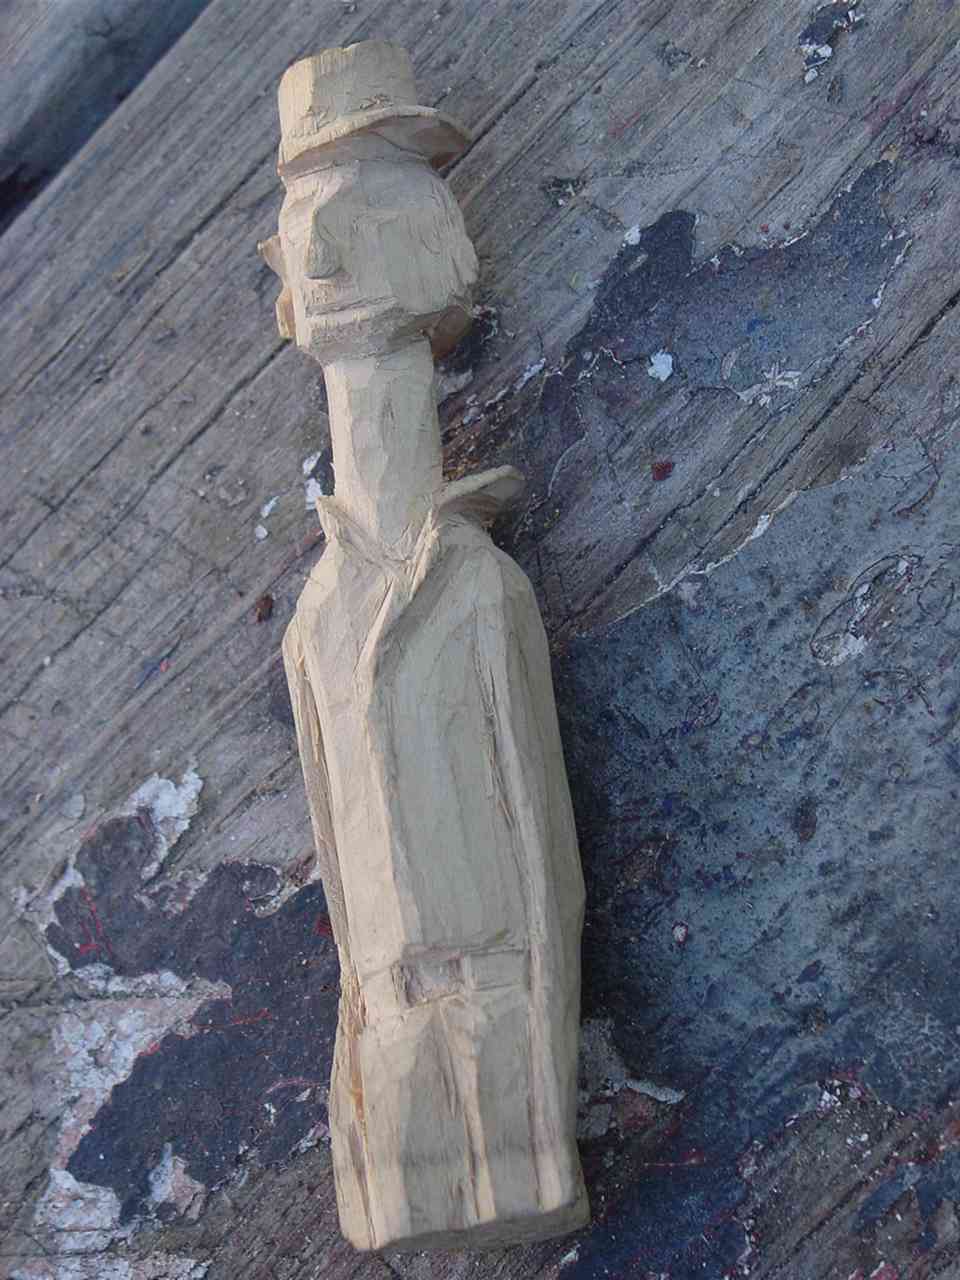
This is my very first carving The brim of the hat was supposed to go all the way around but kept breaking so it ended up off center.

This is my second carving.

This third carving was from a cedar board I grabbed. Cedar is not a good carving wood as it splinters easily.

This fourth carving I posed myself to get the position right. I messed up on the arms and I also learned I don't like sanding with this carving.
At this time, my dad loved to do characters standing straight and tall with their arms down their sides. My forth carving was a kneeling man. I positioned myself to find how to put everything. I messed up on his arms but otherwise he was very well made. What I was after in my carvings was do something different than what Dad was doing.
The style of carving that dad did was an Ozark style where you could see the knife cuts in the form, basically different planes of the surface caused by the knife cuts.
My style is based on that, but because I sort of shave rather than cut my way through the wood, I lose that Ozark style in the translation. My style of showing the planes are a bit sloppy.
When I started wood turning in 2003, Dad thought all that could be done was spindle turning -- baseball bats, candle sticks, chair legs, etc. I learned later that he was really impressed that I could make bowls and plates and other non-spindle things. I know he would be impressed with the turning I am turning now.
My dad died five years ago and I am happy he passed on his love of wood and carving to me.
I am really self taught in carving. What my dad used to do was, "I would show my dad my carving and he would pat me on the head and say 'very good, do another one.'" He taught me some things around carving but the actual carving was on my own. made my own designs and patterns for the carvings I did.
DURING THE WEEK
My boss brought in some pots and pans and let me take them. His wife decided these were just too heavy to use any more and let them go.
These are ceramic coated cast iron pans. Being STAUB made in France, these are not cheap.

Pan set with trivet and baking pan that cooks slices in place.
I had sent out my entry fee the previous week for the art show. I forgot to mention that last weekend.
Saturday
We went yard sailing. At one yard sail I got a plastic display rack. It expands out to nearly double the width. I will make use of it for the art show in March. I have a bunch of stepped wire racks but this covers quite a distance and has good surfaces for setting things.


This display shelf is two parts. the second part that hides inside can be pulled out to make the display twice as long.
On the way home, I stopped at another yard sale and picked up a pair of rachet tie downs and a couple tooth paste squeezers.

I picked these up for a pittance.
Also on the way home, I picked up some ink for the printer I got last week. That was expensive.
Last weekend, I got some foil mini loaf pans. They worked nice and fit in my toaster oven. I had considered getting some metal ones which were a bit more expensive but would last for years. Foil does not hold up.
It then dawned on me that I have this mini loaf baking unit. It had eight mini loaf pans connected together. The foil pan holds two cups while these hold only one cup. The weld had broken on the wire holding them together. Years ago, I had considered cutting the wire to split them up but could not bring myself to do so.

The baking pan set The center weld on the left had broken. this set was just too big to fit in my toaster oven.
I relocated the pans and took them with me. I showed my mom and said I have the choice of having my brother weld it back together, Or I could cut them apart. She said, "Cut them apart." She wanted me to leave some of them together. I decided having them all separate makes them more useful.
I dug out the dremmel and went to work on cutting apart the welds. These pans are aluminum so the metal is soft. I took shortcuts on the process by cutting most of the weld and then twist the pan to the wire to free it. On the ends of two pans, the weld was more extensive than the others. Most of the welds were just between the side of the pan and the wire. On those two pans, the weld also connected to the lip of the pan. I broke the lip off in the process of removing them.
I had to pound the dents out a little bit. I used the vice for some of the work to flatten the bends out.
What I like about these little pans is that they are a good serving. Just enough.

This is the set after I cut them apart. The wire is behind the pans. the two pans on the right shows the left edge broken where the weld went deeper than on the other welds.
Since it was cold, I decided to do some wood turning rather than sit and carve. The turning would have me moving around and I would stay a little warmer. Remember, I am used to having lows in the 80s, not 50s.

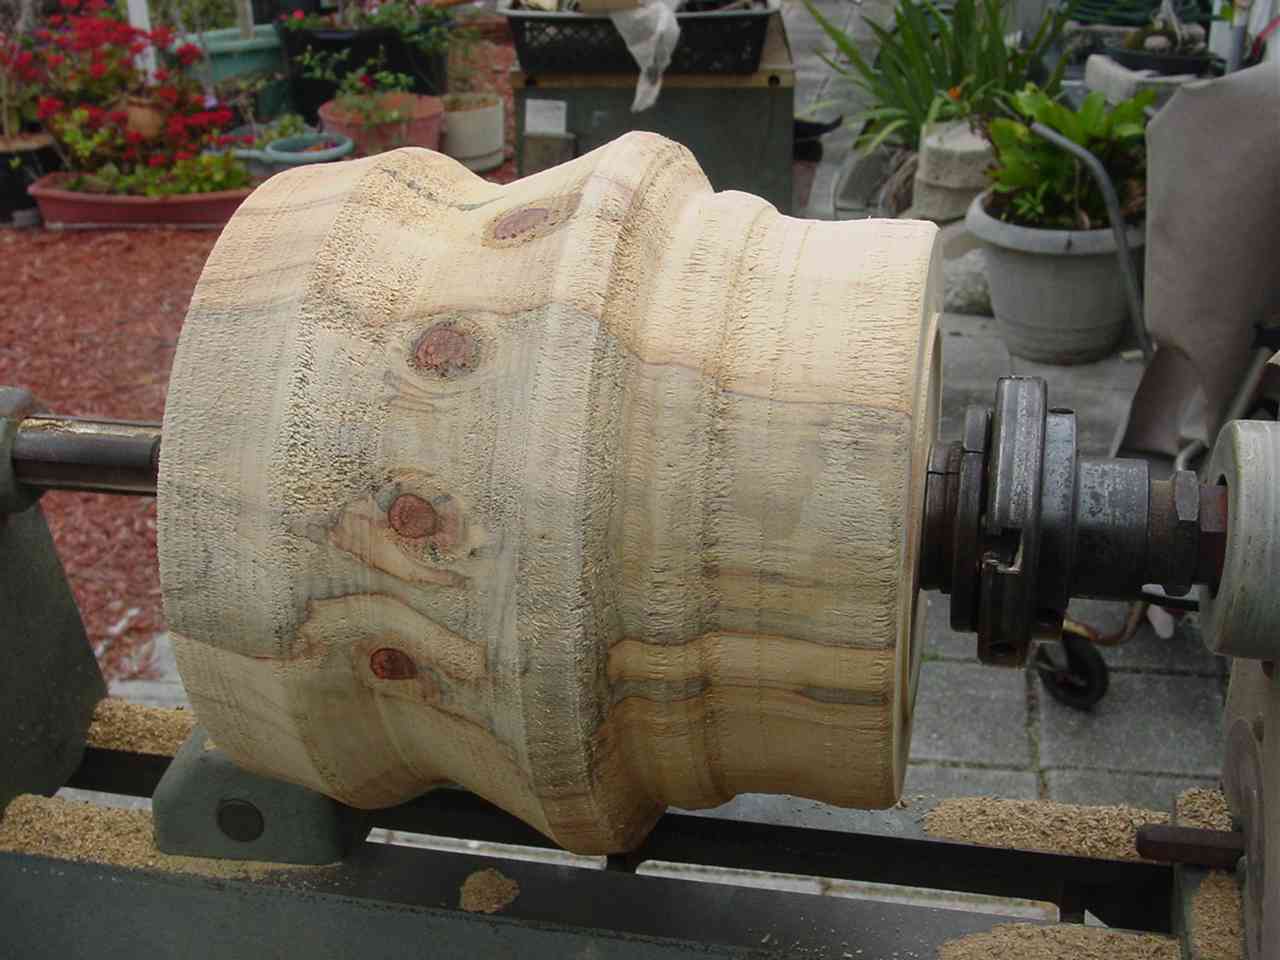
The original log I was making the face vase out of.
I mounted the face vase log on the lathe. I was not totally sure which way the knots were oriented in the log. The branches of Norfolk Island Pine grow pointing up slightly. As you cut into the wood, cutting away the ends of the knot, the knot will drift down toward the base of the wood.
The face profile completed. the center ring is the tip of the nose. the ripple on the right is the lips
I was not completely sure which end was down. I took some measurements and then started cleaning the surface of the wood. The tree had received damage and there was a layer of pitch beneath part of the wood. I needed to cut beyond that for most of the carving. After I cut away some of the surface, I re-measured the knots. I was working on the downward end of the tree. That was perfect as that was the way I wanted the knots to go when I carve the face for the eyes.
I shaped the outside, leaving the end of the nose near the original surface, sloping down to where the eyes should be, coming back up for the brow and then to the lip of the vase.
I turned the piece around because the "banjo" the base of my toll rest would not fit beneath the wood, and I shaped the bottom of the nose and then added a bulge for the lips, then cut in and back out for the chin. All of this was well below the nose and where the cheeks will be. I also shaped the bottom around the tenon so that all I have to do is to flatten the bottom where the tenon is to finish it up.
I finally turned it back around and started hollowing on the inside. I decided to leave the tenon in place in the middle so I can turn it around again if needed. Since this is a nice and big piece, I just cut beside the central tenon.

Starting to hollow it out
One of the big problems with this kind of vase is that I am not totally sure how deep I will have to carve to get the looks I am after. I am turning it thick and hope to re-mount it on the lathe after the face is done and finish the interior and the ends.


two views of hollowing out the vase. the center column can be used to hold the work in the chuck and I may try to save it to make something else out of it later.
Because I worked on the face vase, I feel like I accomplished something substantial. I can point to it and say "See what I did?"
Tomorrow, It will be colder. I plan to finish turning the inside of the vase to reduce the weight so it will be easy to handle when carving the faces. I might also turn something fun while I am at it. There are several designer bowls that I have seen made that I would like to try.
I should do some carving on the dragon. A little bit will add up over time.
I will see what I actually do tomorrow.
Year 12, Week 1, Day Two (week 627) (January 17, 2000 was my first carving day.) 01-15-12 Saturday
46 degrees early morning, 58 when I got out back at eight, 68 degrees by ten and 74 in the after noon. The sky was a soft blue with angel feathers laying high up here and there. They were moving fast. Some small puffs zipped by but mostly the sky was wide open. A brisk breeze had some gusts that sent sawdust really flying. The sun sure felt good, my brother and nephew set up their chairs so they were right in the sun for most of the time they were out back. This weather report is brought to you by the city Of Pompano Beach Department Of Tourism.
I got my equipment out with my first intention of finishing the hollowing of the face vase. I then was thinking that I should carve. My plans changed.
In the olden days, they would have a dead center. Basically a nail in the tail stock that the work spun on. The problem is that the nail would make the hole a bit bigger in diameter and one would lose accuracy the more it spun. Also it would drill its way into the wood which would eventually require regular tightening of the work. It left a big mark in the work where it was riding.
The advent of ball bearings allowed for a smaller effect on the end of the wood. It dug in less, or not at all, and it reduced the friction with the wood and making the hole bigger.
The ball bearing of my tail stock has interchangeable points. It has two kinds of cone points, one point is a cone that extends to the shoulders. Another steps to a shaft and to a small point. this one is missing. I have five other points, a cup that is a reverse cone, a cut that is straight in, a hollow that has a hole going all the way through for drilling, and a point that has a sharp ring and then a tiny point in the center.
I have some baskets that has tools, parts, and junk in. I decided the missing point was in those baskets. I decided to do something about finding it.
I took the baskets off the cart and unloaded them on the table. I sort of separated the stuff as I went, materials for making tools went in one area, parts in another, pieces in another, and tools some place else.
I found many things that disappeared, sinking out of sight. I then restocked things in a different arraignment.
I have small sections of PVC pipe that act like tool holders on the side of my lathe. I have copper fittings that will act like the ferrule for tools to hold the wood together in a handle where the tool fits into it. I have small pieces of copper pipe that I picked up with the idea of making them into plug cutters by filing saw teeth into the ends of them and using a drill to drive them. I have tubing for other uses I may well have forgotten about.
I have metal rods that will eventually become cutting tools, or tool holders. I also have lots of handles or wood that started to be handles. I also found a bunch of cutting bits in need of handles.
In my digging, I found several tool posts that fit on my lathe. One is a flat bar with a bolt on one end to be used ti leverage the tool into the side. I have two others that are jointed for getting the right angle inside a piece of wood for good purchase of the tool. I could have used one of them yesterday.
I have a four jaw chuck where you move each jaw separately. It is usually used in metal working where you can adjust it to the exact center you are after, to thousandths of an inch. I figured out that I can use it for off center turning. I have used it once for that and that was an experiment. Another jaw I have has what is called a cole jaw. The Cole jaw are flat plates that attach to your chuck and there are a bunch of holes in it. It comes with rubber-bumper screws. One can place the lips of a rather large piece in it and clamp it down. It holds work far larger than normal jaws could hold. I also have a bunch of face plates, some were for holding rails in place. The threads are messed up on them, but I do have a threader for that. My brother returned a face plate to me that is a real heavy one with eight screw holes.
Once I had the baskets under control, I decided to take care of two supposedly quick projects. One was to use the face plate to make a sanding disk for the lathe and the other was to use one of my high speed steel metal pieces to make a ultra thin parting tool. I had a handle that it should work with.
I started with the cutting tool first. The handle was Sea grape and it had a shrinkage crack in it. My first step was to remove the copper fitting that I used for the ferrule. A bit of pounding of a hammer on a screw driver along the edges of the fitting to drive it off.
I then ran the band saw through the shrinkage crack, stopping where the ferrule met the handle. I forced the thin blade into the saw Cerf and then drove the ferrule back on. The blade was not fixed in place. I drove some shaved bamboo skewers on each side of the blade into the slots to lock it in place. I then dribbled a lot of super glue into the cracks from every angle. I also used a filler for super glue in the shrinkage crack to fill it in.
After that had set long enough, I mounted it in the lathe with the chuck locking down on the ferrule and cleaned up the handle, sanding it through several grits. I gave it a single coat of varnish. I will give it a few more to protect it and make it look a bit better.

thin parting tool with a sea grape handle.
My second project was to make my sanding disk. I had some yellow pine disks I had created for making plates and bowls. I centered and screwed the face plate in place and then mounted it on the lathe. I trued the edge first, then flattened the front, checking with a ruler to see if it was flat all the way across. I was surprised I got it first try.
I then measured for my eight inch sand paper. I had a couple inches to spare. I could have just turned the excess wood into shavings, but I remembered a project I wanted to work on a year or two ago. I made the excess wood into a ring, cutting a slot near the edge of where the sandpaper was going to go. I rounded the ring so only where I cut through would be sharp . I used my parting tool on this. It worked well but it decided to dig in here and there, partially breaking through at those points while leaving other parts kind of thick. I cut a partial groove on the back side where I could see the holes in the groove. I took it off the lathe and used my carving knife to cut through the rest of the way.

Yellow Pine ring cut from disk
I trued up the edge of the remaining disk, removing some gouges I put into the face and angled the back so the edge was about an inch thick. I stuck my peel-and-stick sand paper onto the face of the disk and it fit nicely. I then got some rubber cement. I put rubber cement on the edge of the disk, and more rubber cement on a strip of emery cloth that I measured to fit on it.
I planned on have an ever-so-slightly overlap between the ends. The top of the disk comes down towards you. I planned on having the end overlap the lead to guarantee that the edge would not catch. I made a second cut and the ends wound up exactly in place.
The I had let the rubber cement dry a little so it was just a little tacky and then put the two pieces together. this is how you make the strongest bond between two pieces. It becomes like contact cement.
My first test of the sanding disk was to use it to clean up the rough edges and interior of the ring I had made. It worked nicely. I used the top to sand inside the circle and get the back corner.
My nephew was needing to sand something and I let him use the lathe sander. I took the tool rest that had the bolt in it and that gave him a flat area to act like a sanding table.
This was a successful project. My lathe is not as fast as the disk sander, but I can adjust the speed, run it really slow when I have to do careful work or run it quite fast when I need it.

Sanding disk in use
I took out my mini lathe after I cleaned up the big lathe and decided to see how bamboo machines. I made a mistake and applied too much pressure to the tail stock and it split out the bamboo. I did see that it will machine some. I did not do enough to find out if there are any real problems. I can see where it would be nice to bring bamboo down to a specific diameter.
My brother and nephew came just before lunch and my nephew decided he wanted to make a brass guard for a sword. He needed to make a wooden pattern for it. He took a piece of wood, drew a design on it and cut it out on the band saw. He used my lathe sander to clean it up some.
We mostly talked while I cleaned up the area, discussing sword design and composition, machining and science.
Next week, I have to work on the dragon foremost and then on the face vase. I can carve on the face vase as it is now since I removed a lot of the weight from it. I have plenty of wood inside so I can dig in as much as needed. I will then finish hollowing it out and make any corrections in the turned outside that is needed.
I have a turning club meeting on Thursday. I only have the turned bird to show off this time. I might dig out some of the bird ornaments I made and show them off with it to show how they look big and small. I have some sanding and more varnishing to do on that bird.
I will see what I actually do next weekend.
No comments:
Post a Comment