Sunday, April 28, 2019

Year 19, Week 14, Day One (week 1004)

Year 19, Week 14, Day One (week 1004)
(January 17, 2000 was my first carving day.)
04-13-19 Saturday

78 degrees early morning, 83 in the afternoon. Mixed clouds through the day but mostly sunny. This weather report is brought to you by The Pompano Beach Department Of Tourism.

Mom wanted to talk to the people at the library book sale to find out why they were not accepting books at this time. We ran part of our yard sale route to get there. It appears they were swamped with books and were taking a break until May to sell off the stock they have.
Over the decades Mom had collected hundreds of travel books for use by her painting classes to go by. She only has a couple students and they are not doing that kind of painting. She has not touched theses books in years so she is looking to pass them on. She was given leads to a couple places and will have to check that out later. I would love to get the books but I don’t have a place for them and I am not in a position to look at them. They would be nice after I retire but that might be a couple years from now to forever, before I get there.

We hit several yard sales, only a couple of them hand some good stuff. I got a set of Forstner bits that were lightly used, a small ratchet set, a “Swiss army” pocket knife with like 10 blades, and a few other things I really did not need. My idea of the ratchet set was to have that out back. I needed it a couple weeks ago. And could not figure out where the several dozen sets we have collected were.

On a lark this week, I searched my place and found some pocket knives I had once sharpened for carving and a couple straight razors. I examined them once I got out back. One razor has a couple some chips on the blade near the handle. It had the box it came in but the handle is broken. A little glue would fix it nicely, or make wooden handle covers, depending on the mood. The other razor is almost sharp enough to shave with. Not quite but almost. It could be used for carving but I decided the edge is really too delicate for wood. Most of the knives need some honing and stopping to get them sharp enough to carve with.  Every one of them is sharp enough to cut fingers, though. 
The key to using these pocket knives for carving is that it takes some pressure to move the blade closed once they are out. There are cuts where you end up with a little pressure on the back of the blade and you don’t want it to close on your fingers. 

I dug into the shed and found some platter blanks. One had been attacked by bugs. I tossed that. I took one that was mostly rounded, did a little clean up on the bandsaw to finish the rounding job as a couple spots were too big to spin on the lathe. I mounted it on the lathe and decided to make it into a bowl. It is two inches thick and near eleven inches in diameter and wanted to see what I could come up with. I started turning it and quickly saw some signs of bug holes. Since this was an experiment, I decided continue with it. I kept shaving wood until I got it down to the depth I wanted. 
I was rounding the outside edge and was standing behind the motor of the lathe, shaving the backside of the bowl trying to clean up the curve I was after. I saw something zip away from me, and an instant later saw light through the platter, that is referred to as a ghost as you think you can see through the piece.  I instantly  turned the lathe off. About a third of the bowl was gone. I was reminded that this is one reason you don’t stand directly in line with the piece you are working on. I hunted for the other piece. I knew which way it went but could not spot where it ended up. I looked high, low, in the plants, behind plants. 
Then I happened to glance through the fence and saw it on the other side of the fence in the dirt. I figured it had to have bounced off the neighbor’s wall. The five foot tall fence was about 30 feet away and the piece cleared that. I am glad no one was in the way, especially me, and that nothing was damaged. If it hit, it would have hurt. I was lucky that time. 

Recently I made a vase that had knots that resembled eyes. I decided I would erase my pencil lines and try to do the face right. 
I learned long ago that when you sand away pencil lines, you must tip the piece so the dust falls OFF the wood. The pencil dust the sandpaper lifts up and lands back on the wood and settles in. It takes a whole lot more sanding to remove it as it keeps landing again in the same places. Only dust that attached to the wood is scraped off . By tipping the piece so the dust falls off, the pencil work disappears quickly. Of course, since I was sanding the piece, I had to give it more sanding.  Which improved it. I really need to improve my tool handling and tool sharpening to reduce the tear out that I have had to deal with on this piece.

I will see what I do tomorrow.


Year 19, Week 14, Day two (week 1004)
(January 17, 2000 was my first carving day.)
04-14-19 Sunday

76 degrees early morning, 83 in the afternoon. Mixed clouds through the day but mostly sunny. This weather report is brought to you by The Pompano Beach Department Of Tourism.

I decided to try to make another bowl. There was a splintered piece of wood on one side and I really should have cut that off. A quick cut and it would have solved the design problem it caused. 
Instead, after hollowing out the inside of the bowl, I kept modifying the edge to remove the splinter until I ended up with an outside shape I was not wanting. It was not horrible enough to toss. I cleaned it up, sanded it and decided that was good enough.
My brother and I talked about videos we saw. I had sent him some interesting ones this week.  When on Facebook, some wood working or fabricating videos show up and I will save their links and later view them before I send them to my brother. It is cool how they create something out of very little, and they work.
One was a dowel maker just made up of drill holes in a piece of wood. The guy drilled a main hole, then inset some shallower holes overlapping it.  The edge of the overlapping holes becomes the cutter for the dowel maker. He chucks the piece of wood in his drill and spins it into the dowel cutter and ends up with a nice dowel. He sands it while on the drill and ends up with a good dowel in whatever wood you happen to want to work with. Not just pine. If you are working with an exotic wood and need dowels, this dowel maker will do it.
I have seen many other dowel makers and this one seems to be the nicest. You simply have to drill a hole into the metal plate (backed with a block of wood) the diameter you want the dowel to be. 
We also discussed a wooden drill-press a guy build. What I loved was the technique of getting it straight and true. It used a regular drill for the power but he had screws that pushed the drill in one direction or another and using a square, he was able to lock it in place exactly square. 

When I made knives last month, one knife was just not right. The tang was not long enough and my method of locking it in place was not working. The bade was from end of a blade that I broke.
I ground the tenon just a little longer and a little narrower, losing a bit more blade length. That is not a problem, though.  I then sanded the end of the handle on the disk sander till I was past the worst of the damage from previous attempts to install it. I then drilled a tiny hole which was smaller than the tang  and then drilled a slightly bigger hole just shallow enough to get the blade started.  I took a small hammer, set the tip of the blade (squared off tip) and rapping on the end of the handle, I drove the blade in. I used the vice to turn it slightly so it was square to the handle and finished driving it in.  I now think it will hold now. As long as the blade holds, it will be a good knife.

I cleaned up and left early. I had to go home and make out forms for my Texas. I would rather pay Idaho or Arizona, but they insist I pay my Texas.  

I have a turning club this week. I will see what goes on.

1596


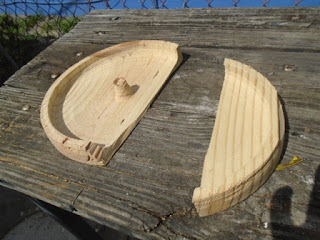
the broken bowl. the part the flew was quite big. I had the lathe going fast.

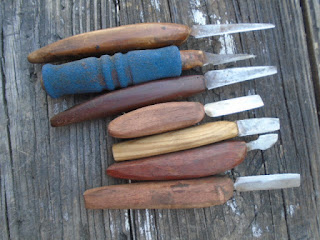
the select ion of knives and razors I have. 

bottom of the second bowl I made

top of the bowl.


this shows how the razors are made and how they are designed to be sharpened and stropped. Just a tiny bit of the edge is actually on the leather. this is how they get such fine cutting edges
the edge is delicate but ultra sharp and it takes limited skill to sharpen them..

Friday, April 19, 2019

Year 19, Week 13, Day One (week 1003)

Year 19, Week 13, Day One (week 1003)
(January 17, 2000 was my first carving day.)
04-06-19 Saturday

73, early morning 83 late afternoon. High feathers early morning, becoming lower and more solid late in the day, mostly sunny during the day. Light breeze was almost unnoticeable. This weather report is brought to you by The City of Pompano Beach Department of Tourism.

Mom was doing something else not involving me, so after breakfast, I decided to do some yard sales. I usually head North on the west side of US-1 before heading south on the other side. Today I decided to head South first, running my route backwards. I am glad I did. There was a bicycle event and they were heading south as I was heading North. If I had followed my normal route, I would have been traveling at about 18 mph rather than 25 mph and not being able to pass any bikes. Makes a big difference. I heard it was a 100 mile bike race. 
Other than one sale I found very early that only had furniture, which was high quality furniture better than anything I or mom had,  I only found yard sales as I was heading south on the way back home. 
One had clothing. Not my size nor my style. One had some tools and I picked up a large glass lid for a pot, a set of six used router bits and a fillet knife. I can’t sing but I still got all of them for a song. The last yard sale had craft supplies. I should have bought more than I did. I picked up a leather punch set. I thought I would have a use for them.  There were beads, buttons, a whole set of crafting scissors for creating decorative edges (wish I had gotten them), and paper for scrap booking. I hated to walk out with just one thing but I did it. 

I got out back of mom’s house and decided to take the piece of pine I rounded last week and my plan was to make it into a tea pot I saw in a magazine. I tried drilling the hole for the spout, using a really long drill bit. It would not go in, and I finally gave up. I looked at the shape I had already where I had removed some wood for the throat and rounding the bottom and creating a neck and liked the knots so I decided to make it a vase. 
I mounted the block on the chuck after I made a tenon and hollowed it out. When I got far enough, I decided it being thick would not be a problem. I sanded “it pretty good.” I removed the tenon and only had a little stub when I took it off the lathe. I used my knife to carve off the stub, then used a small sanding disk on a drill to shave away any sign of the stub. 
I looked at the “finished” piece. It has some tear out showing where my tool techniques are not good (it is even harder to have good tool techniques on soft wood). It is a lot thicker than I intended. I then realized it was demanding to be carved.  Later I was looking at it again and saw that two small knots would be good eyes for a face. I will give it even more thought.

I looked at my knives with their new sheaths. The sheathes are just square blocks of wood and decided to make them smaller. I and used each knife to shave some of their own block down. They were not doing great on the wood. I then did one of my old blades and it ate at the wood in comparison. I checked that knife on other types of wood the sheathes were made of and learned it was the only really sharp knife I have. 
I took the blocks to the bandsaw and removed most of the wood. The blade side was straight and somewhat level. The back side I did at an angle and rounded it at the end. After the bandsaw work, I went to the disk sander and sanded the sheaths to the final shape. They are smaller and it is easier to see which side the blade goes in. 
Several of the new knife handles need correction to feel right and even more sanding but that will be for another time. 
I sharpened some of the knives better. They are not perfect yet.

That was a pretty good day of small projects. It is fun to have some results. 

I will see what I do tomorrow.


Year 19, Week 13, Day two (week 1003)
(January 17, 2000 was my first carving day.)
04-07-19 Sunday

77 early morning 84 as the high, few clouds early morning, building up as the day wore on. Mostly sunny and light breeze. This weather report is brought to you by The City of Pompano Beach Department of Tourism.


Mom is still involved in something and was not around. 

My brother and niece showed up. We sat out back. I showed them the vase and we talked about videos I sent my brother, and videos he’s seen other places. While we were doing that, I was sharpening my knives even more.  One knife had a slightly loose blade. I sanded the blade so it would be sharp. I blued a spot on the blade (don’t do that!!!). I saw the blade was loose and I touched the blade with my finger. I have a nice blister on my finger as it was hot. After it cooled, I sanded the knife end of the handle back so much of the slot and other things on the edge were now gone, and I drove the blade in again. Now it is tight and I doubt it will move for a while. 
Some of these knifes have multiple angles on the sides rather than a single angle over the entire piece. I still did not get them all with a single slope from back to the edge , but they are all much better than they were.
I sharpened each knife until they can shave a little bit of hair on my arm. They are not true razor sharp, but they can remove some hair. When dull, they scrape the skin but do not touch the hair. They are sharp enough to work with. Now if I do things right, I should give it a few touches on the stone, then on the leather strop when I sit down and carve with them.  They will become a nice blade. 
I sharpened a chisel and I looked at some SCORPS I have. Scorps are chisels where the cutting edge is turned at a 90 degree so you pull them with your fingers through the wood like a knife. They do need work but are not too bad. I never got them to work really well for me. I usually only use them for a few minor fixes where the knife cannot remove the wood right (more likely caused by carver’s bad technique)
The Scorps are kept in a roll pouch where there are pockets for the scorps and you roll it up to protect them and tie it. I found another pocket knife that I sharpened to be a carving knife. I seem to remember having like four or five of knives like this, but have no idea where they might be. 

Chisels and knives operate differently. Knives are pulled sideways while chizels are pushed from the end. They have different effects on how the wood cuts. With the knife, when you want to create a valley in the wood, you basically V cut the wood with the bottom of the angles meeting at one spot and same depth. If you over cut, you end up with what can be called FEATHERING, where the wood ends up as attached strips, like feathers. 
Chisels, on the other hand, cut and lift the wood up as it cuts, leaving clean smooth wood behind it. Most carvers use chisels. The problem is you need a good number of chisels to get all the effects you need. You have to have several chisels of different radii, several width straight, several angles of V chisels. It does not take long to end up with a very large number of chisels one has to know when to use. 
A knife, on the other hand, basically has a cutting edge and some form of point. You can shave, slice, V-cut, bore, with just one tool. You just have to know how to get it to do the job you are after. You can have specialty carving knives or one can use a stiff pocket knife to carve. I’ve made my own carving knives (recently too) that will do everything I want to do and made them quite cheaply. Making a chisel takes more skill and better material than the needed for knife. 

A note on sharpening knives. I get the best results by applying a twist on the knife when working it on the stone, with the pressure toward the edge, if the side has any rounding at all. It will make the edge the concentration of the grinding pressure.

We talked more than doing anything while my brother was there. 

Mom’s neighbor has a table that he wanted to put on wheels. I have some ball-bearing wheels I picked up from Harbor Freight, so we tipped it upside down. The people working in the house during remodeling had said that it was broken. We did not know how, though. When we turned it upside down one of the two sections beneath it, came off. I cleaned glue on the edge of the support section, and then globbed glue on both surfaces and set the section back in place, tapping the nails back in again.  
I then found screws at about the right length (long enough to go into the table top but not long enough to go all the way through)  and drove them into the connection in some more places between nails. I should have added screws to the support on the other side but decided to leave it as is. This table now moves easier than it should, but he is willing to will live with that. About that time I was wore out. It was about time to head home.

I will see what I do next week.

1765

the shaped sheaths on the knives

the table repaired. 
when the center section comes out. those two supports close to become one piece.
the leather tools with a block I tested the shapes on

a close up of the leather marking tools

a closeup of the marks they made in the wood. not in order.

one side of the vase showing large knot.

showing the crack in the piece

showing the crack on the bottom

the knotts that look like eyes.
this piece is demanding to be carved.


Sunday, April 14, 2019

Year 19, Week 13, Day One (week 1003)

Year 19, Week 13, Day One (week 1003)
(January 17, 2000 was my first carving day.)
04-06-19 Saturday

73, early morning 83 late afternoon. High feathers early morning, becoming lower and more solid late in the day, mostly sunny during the day. Light breeze was almost unnoticeable. This weather report is brought to you by The City of Pompano Beach Department of Tourism.

Mom was doing something else not involving me, so after breakfast, I decided to do some yard sales. I usually head North on the west side of US-1 before heading south on the other side. Today I decided to head South first, running my route backwards. I am glad I did. There was a bicycle event and they were heading south as I was heading North. If I had followed my normal route, I would have been traveling at about 18 mph rather than 25 mph and not being able to pass any bikes. Makes a big difference. I heard it was a 100 mile bike race. 
Other than one sale I found very early that only had furniture, which was high quality furniture better than anything I or mom had,  I only found yard sales as I was heading south on the way back home. 
One had clothing. Not my size nor my style. One had some tools and I picked up a large glass lid for a pot, a set of six used router bits and a fillet knife. I can’t sing but I still got all of them for a song. The last yard sale had craft supplies. I should have bought more than I did. I picked up a leather punch set. I thought I would have a use for them.  There were beads, buttons, a whole set of crafting scissors for creating decorative edges (wish I had gotten them), and paper for scrap booking. I hated to walk out with just one thing but I did it. 

I got out back of mom’s house and decided to take the piece of pine I rounded last week and my plan was to make it into a tea pot I saw in a magazine. I tried drilling the hole for the spout, using a really long drill bit. It would not go in, and I finally gave up. I looked at the shape I had already where I had removed some wood for the throat and rounding the bottom and creating a neck and liked the knots so I decided to make it a vase. 
I mounted the block on the chuck after I made a tenon and hollowed it out. When I got far enough, I decided it being thick would not be a problem. I sanded “it pretty good.” I removed the tenon and only had a little stub when I took it off the lathe. I used my knife to carve off the stub, then used a small sanding disk on a drill to shave away any sign of the stub. 
I looked at the “finished” piece. It has some tear out showing where my tool techniques are not good (it is even harder to have good tool techniques on soft wood). It is a lot thicker than I intended. I then realized it was demanding to be carved.  Later I was looking at it again and saw that two small knots would be good eyes for a face. I will give it even more thought.

I looked at my knives with their new sheaths. The sheathes are just square blocks of wood and decided to make them smaller. I and used each knife to shave some of their own block down. They were not doing great on the wood. I then did one of my old blades and it ate at the wood in comparison. I checked that knife on other types of wood the sheathes were made of and learned it was the only really sharp knife I have. 
I took the blocks to the bandsaw and removed most of the wood. The blade side was straight and somewhat level. The back side I did at an angle and rounded it at the end. After the bandsaw work, I went to the disk sander and sanded the sheaths to the final shape. They are smaller and it is easier to see which side the blade goes in. 
Several of the new knife handles need correction to feel right and even more sanding but that will be for another time. 
I sharpened some of the knives better. They are not perfect yet.

That was a pretty good day of small projects. It is fun to have some results. 

I will see what I do tomorrow.


Year 19, Week 13, Day two (week 1003)
(January 17, 2000 was my first carving day.)
04-07-19 Sunday

77 early morning 84 as the high, few clouds early morning, building up as the day wore on. Mostly sunny and light breeze. This weather report is brought to you by The City of Pompano Beach Department of Tourism.


Mom is still involved in something and was not around. 

My brother and niece showed up. We sat out back. I showed them the vase and we talked about videos I sent my brother, and videos he’s seen other places. While we were doing that, I was sharpening my knives even more.  One knife had a slightly loose blade. I sanded the blade so it would be sharp. I blued a spot on the blade (don’t do that!!!). I saw the blade was loose and I touched the blade with my finger. I have a nice blister on my finger as it was hot. After it cooled, I sanded the knife end of the handle back so much of the slot and other things on the edge were now gone, and I drove the blade in again. Now it is tight and I doubt it will move for a while. 
Some of these knifes have multiple angles on the sides rather than q single angle over the entire piece. I still did not get them all with a single slope from back to the edge , but they are all much better than they were.
I sharpened each knife until they can shave a little bit of hair on my arm. They are not true razor sharp, but they can remove some hair. When dull, they scrape the skin but do not touch the hair. They are sharp enough to work. Now if I do things right, I should give it a few touches on the stone, then on the leather strop when I sit down and carve with them.  They will become a nice blade. 
I sharpened a chisel and I looked at some SCORPS I have. Scorps are chisels where the cutting edge is turned at a 90 degree so you pull them with your fingers through the wood like a knife. They do need work but are not too bad. I never got them to work really well for me. I usually only use them for a few minor fixes where the knife cannot remove the wood right (more likely carver’s bad technique)
The Scorps are kept in a roll pouch where there are pockets for the scorps and you roll it up to protect them and tie it. I found another pocket knife that I sharpened to be a carving knife. I seem to remember having like four or five of knives like this, but have no idea where they might be. 

Chisels and knives operate differently. Knives are pulled sideways while chizels are pushed from the end. They have different effects on how the wood cuts. With the knife, when you want to create a valley in the wood, you basically V cut the wood with the bottom of the angles meeting at one spot and same depth. If you over cut, you end up with what can be called FEATHERING, where the wood ends up as attached strips, like feathers. 
Chisels, on the other hand, cut and lift the wood up as it cuts, leaving clean smooth wood behind it. Most carvers use chisels. The problem is you need a good number of chisels to get all the effects you need. You have to have several chisels of different radii, several width straight, several angles of V chisels. It does not take long to end up with a very large number of chisels one has to know when to use. 
A knife, on the other hand, basically has a cutting edge and some form of point. You can shave, slice, V-cut, bore, with just one tool. You just have to know how to get it to do the job you are after. You can have specialty carving knives or one can use a stiff pocket knife to carve. I’ve made my own carving knives (recently too) that will do everything I want to do and made them quite cheaply. Making a chisel takes more skill and better material than the needed for knife. 

A note on sharpening knives. I get the best results by applying a twist on the knife when working it on the stone, with the pressure toward the edge. If the side has any rounding at all. It will make the edge the concentration of the grinding pressure.

We talked more than doing anything while my brother was there. 

Mom’s neighbor has a table that he wanted to put on wheels. I have some ball bearing wheels I picked up from Harbor Freight, so we tipped it upside down. The people working in the house during remodeling had said that it was broken. We did not know how, though. When we turned it upside down one of the two sections beneath it, came off. I cleaned glue on the edge of the support section, and then globbed glue on both surfaces and set the section back in place, tapping the nails back in again.  
I then found screws at about the right length (long enough to go into the table top but not long enough to go all the way through)  and drove them into the connection in some more places between nails. I should have added screws to the support on the other side but decided to leave it as is. This table now moves easier than it should, but he is willing to will live with that. About that time I was wore out. It was about time to head home.

I will see what I do next week.

1763


vase with big knott

crack in wood

knives with new sheaths

two knots that look like they could be eyes of a face.

transplanted tree starting to grow

repaired table. the right section was what broke.
he has an insert between the end pieces of the table.
when closed the base looks like a solid piece.

Tuesday, April 9, 2019

Year 19, Week 12, Day One (week 1002)

Year 19, Week 12, Day One (week 1002)
(January 17, 2000 was my first carving day.)
03-30-19 Saturday

68 degrees early morning 81 late afternoon, light breeze lots of sunshine with some clouds. This weather report is brought to you by The City of Pompano Beach Department of Tourism.

I found that I had two butcher blocks of knives I had not sharpened last week. What I had sharpened last week was the knives I use the most. A lot of these butcher block knives are serrated knives. Not my favorite. I took them out and sharpened all of them. 
With serrated knives, they have the serrations only on one side of the blade. The other side is flat. What you do when you sharpen these, is not to touch the serrations, just the flat size. The only time you touch the serrations is to use a triangle file following the grooves to make corrections.
Some of my straight bladed knives needed edges so they got the sanding disk treatment. With the serrated knives, I laid them down flat on the grind stone and worked them until they had an edge. While I am not using these knives, I now have them nice and sharp. 

There is a planter next to the front door of the neighbor’s house, and that I am basically maintaining his yard, I decided to take care of some weeds that were literally over a knee high. I grabbed a rake and a shovel and pulled the worst of the weeds out. I ran out of energy before I got all the weeds but I got rid of the worst of them. I will get the rest some other time when it is convenient. I am not used to that kind of work.

A couple months ago, mom had my brother uprooted a tree that went into the ground through the bottom of a pot. She removed most of the roots, and all the branches, then transplanted it to a larger pot, and put that in the neighbor’s front yard next to the palm trees that are in pots there. Mom said that if it dies, it dies. That is the punishment of going into the ground. Last week we noticed that the trunk was sending out leaves here and there. It lives. By this time next year, it will have good branches sticking out.

I decided to make some sheaths for my knives. I found some straight molding and I cut pieces off of it about the right length, then split them on the band saw. I then sat down and traced around each blade and carved out the blade shape on one side. I dug deep where the back of the blade would be and just a little at the edge side of the blade. Once I had it carved out so the knife would fit below the surface, I glued a second piece onto it and clamped them. I had some battery cables with bad cables so I cut the wires off and kept the clamps. They have strong springs and the teeth used to hold the posts of the battery will not slip. They will “mar” the work though but if you don’t care they are great. I set the knives next to the corresponding blocks. 
My idea is to carve each one into something. Years ago, I had one carved into a running dog. These are a lot bigger than they need to be, but I can cut them smaller when needed.

I decided the blocks that the wheels are attached to, on the lathe, needed more reinforcement. There is a lot of tipping force on those blocks and two bolts is not strong enough (one corner has a screw instead of a bolt). The surface I am rolling them on is twelve by twelve inch paver patio that are not evenly laid. Catching on them creates a lot of force to the side. I got some bolts today  and tomorrow I will fix that. It is holding all right for today, though.

I took the lathe out and grabbed a beam I had picked up in a garbage pile earlier this year. It has a big crack in it which was why they tossed it. I cut a piece off with the saws-all. While it was a bit of a problem because I could not effectively hold it down, I held the block as I cut the corners off. It bounced a lot, but once I got past the surface, I could apply my weight to the block to hold it better. Removing the corners allowed me to reduce the time on the lathe. 
I put it on the lathe and rounded it. I did not go any farther as that was enough for the day. I accomplished something. This is a pine beam. I am thinking that it is not a yellow pine. It is softer than that. The crack might not work for my plans but I will think about that when I dig into it again. The crack could be filled with no problem if it is a problem.
There are times that just making a mess is satisfying.


Year 19, Week 12, Day Two (week 1002)
(January 17, 2000 was my first carving day.)
03-31-19 Sunday

68 degrees early morning 81 late afternoon, light breeze lots of sunshine with clouds. Predicted weather never came. This weather report is brought to you by The City of Pompano Beach Department of Tourism.

I unloaded the lathe completely and tipped it up on end. I ran in a bunch of bolts into the blocks holding it up (the wheels are screwed into the blocks). One bolt in each corner is not enough to hold the blocks in place when the wheels bump on the edges of the patio stone patio I am working upon.
Mom had gotten a new drill for Christmas and she has it out back for us to use. It is not the top of the line drills, but a good light-utility drill. I used my dremel with the largest bit it could hold to drill a pilot hole. I then drove the bolts in. The bolts would not go all the way in. I tried to force it and my brother told me “that is a good way to burn the drill up. It was already beginning to smell. At first I left the bolts proud, but later I used a crescent wrench to drive them in all the way. 
With the bolts already there, I added two more to each corner. I tried to offset them a little but it ended up very little offset. I figure three bolts might slow the chances of the blocks from pulling the screws out and tipping. 
I then had to put everything back on the lathe again. If I load and unload the lathe entirely, another ten times, and I should be able to do it in just minutes. I don’t have near as much stuff on it as I once did. I have just the turning tools and some blocks of wood. I had removed all the weights I was using to hold the lathe bed down. Not needed for the kind of work I am doing.

I mounted the sanding disk on the lathe and sanded the knife sheaths so the edges all matched. I did bandsaw a couple because I grabbed the wrong blocks when I put them together so there was a big difference between the two pieces. 
I then sat down and tried to figure out what knife went with which sheath. I had set the knife next to the block it was for when I glued them up. When I grabbed the blocks, I did not note which knife went with them. I just gathered them together.
Some knives fit easily into their sheath, but some just would not go in. I finally found matches for all of them. One knife would not go in no matter what. I did not shave down the knife-shape deep enough. I now had to go with plan Q (other plans already failed). I took a drill bit in the dremel and drilled out the space bigger and bigger until the knife could fit in. 
None of the knives fit all the way into the sheaths. That is a half intentional. Over time, the wood will get scraped more and more, and the knife will fit in deeper and deeper, until the fit will be loose. I am mostly protecting the point and most of the knife. There is sheath and handle to help let people know one does not touch the blade.
These pieces are about an inch and a half wide so they are comparatively bulky. I likely will remove a lot of the width when I get out there next time. Because of the blocks, I could not stick them into the holder like I had them in before.  That will be a good incentive to carve them into something fairly quickly. 
I will admit that I don’t really need this many knives. I had a whole bunch before, and have no clue what happened to them. One knife I made this past month is missing. It disappeared right after the turning club meeting. There are two places it could be if I still have it, but have to take the time to dig to find it in those places. 
The big reason I got the idea of making knives was I had given a couple knives to a friend, who lives out of town, and I told him that learning to make your own knives is a good idea, even if it is done only once. When you know the process of making something, you can modify it to meet your needs, or you can make another one if you destroy it. I decided I would practice what I was preaching.
Oh, here is something I have never mentioned. You CAN sharpen pocket knives for carving. People did that back in the day. They MUST have stiff blade hinges. One of my pocket knives had a loose blade and I nearly cut my finger several times when the blade buckled while working with it. That knife was not sharpened to the razor sharpness of the carving knives. The knives do not have to be the locking type where you push a button to close it, but must be stiff so takes some pressure to close them. I have one pocket knife with all three blades sharpened for carving, but all the blades don’t need to be sharpened for carving. Just one is really needed, and many people use the smallest blade for carving. The smallest blade, a lot of times has a rounded end which I find to be better for carving. Some people like the points, I have not found a big advantage to that.

A couple friends have birthdays about a month apart. I send them some items in the same package. I saw a picture on line that really caught my eye. I decided to paint something on the idea of that picture. I decided I would paint three cards, one for each friend and one for me. They were basically the same except for the focal point of the paintings. It is hard to get good details when painting on a standard sized greeting card. Also I am using the cheap bottles of acrylic paint and one does not get a good definition of colors with them. Unlike the expensive oil paints where you can get pure colors that will mix, the acrylic paints are combinations of colors and don’t mix. Unless you have every color available, you have to make do with the color combinations you have at hand. Anyway, I did the basic painting from memory before re-looking at the original picture. I finished the cards and got them ready to mail out on Monday. They are not bad, not as good as I was hoping, but not bad.

I was pretty much lazy this weekend. I accomplished a lot less than intended. I have enough projects planned to do that would take 8 hour days, every day, for about a month. 
One medium priority project is to empty out the shed and see what is all in there. There are a lot of stuff I remember having but have not seen. I have a lot of stuff out at the work bench area that should be put away. It is best to dig everything out, find out what I have and then put stuff away the way they are supposed to be put away for best access. 
I have more pressing projects ahead of that, though. It will mostly be a balance of what needs to be done, and what energy I have, and the opportunity. Plans change by the minute some times. I had only planned on making one set of knives. I never planned on sharpening kitchen knives.

I will see what I actually do next weekend. 


2196
new blades

new knives

the top knife is the last "pointed" knife I made
the blue handle was made by my dad. note the point.
the next four knifes are new. the second from the bottom is the blade I broke when trying to pull it out.

sheaths for the knives.

extra bolts to hold the blocks in place on the lathe. 

one of the three cards I painted. it is based on a picture I saw on facebook. 
I painted them from memory, then looked at the original picture for a few details.
this one is looking at an orb.

as bad as it is, this one they are playing chess, which they were doing in the original picture.

here they are talking to a fairy. 

the tree mentioned where we cut the branches off and heavily trimmed the roots because the tree had the nerve to go into the ground. we put it in a larger pot and stuck it out front. if it died, it died.

proof that it is still alive. next year it will have nice branches. 


Monday, April 1, 2019

Year 19, Week 11, Day One (week 1001)

Year 19, Week 11, Day One (week 1001)
(January 17, 2000 was my first carving day.)
03-23-19 Saturday

Mostly sunny, with lots of clouds. 56 degrees early morning and 80 late afternoon. This weather report is brought to you by The City Of Pompano Beach Department Of Tourism. 

The turning club was pretty good. We will have a different site next month. 
There was a five minute demonstration on safety, something they started to do this time. The explanation was on how most of us never lock the tail stock in place when we work. Instead we crank it tight and later have to tighten it again. He said that the vibrations and the direction of the spin will cause the tail stock to loosen and the piece we are working with will come loose and possibly fly off. 
The main demonstration was on turning off center work. He glued two different pieces of wood together, and mounted them on an angle in the lathe. The drive center near one corner, and the tail stock near the opposite corner. He then turned the piece partly round, created a tenon and then mounted it on the chuck and made them a taper.  He did not finish the turning as the lathe had no power for some reason. He showed the end result with one he finished previously. The top on one had the dark wood, the other had the light wood on top, and the joint between the two pieces of wood was on an angle to the piece. 
He said that you buy plastic or rubber bungs at hardware store and drill the inside to fit the bung, drill some tiny holes on top and you have a salt and pepper shaker that is easily discernible.
I had stopped at mom’s during the week and got the knives somewhat finished to show off at the turning club. I included pictures of the knives at a couple steps. I also had the goblet and little vase. The goblet had fallen and the stem broke. I glued the stem back together and hoped for the best. It stayed together and you could not see the joint. 
We figured out that the wood was Mango. That is from mom’s neighbor’s tree. 

Saturday

I grabbed a file I had laying around and made a new pair of knives. It did not take much time to make the blades. All I remember from the past was that making the blade was a whole lot of work and a real struggle. This pair came out of the file real quick. I went through six handles trying to get the knives right. The last two, I used some pressure treated two by two to make the handles. I did do a couple things right this time. I made both tenons that go into the handle a lot smaller. I also ground them so they were offset. The edge is farther away from the tang than I did before. Being smaller, they should not split as easily, but they still did.  The knives went in on an angle, tipped, the holes were not quite as big or long as they needed to be, I also figured out that this black walnut is not as strong as they should be such as when I first got them so just a little pressure would crack them. 
The knives I showed at the club were not sharpened yet. I sharpened them and so they could be used. The same for the new blades I made. 

I figured something out about sharpening kitchen knives. There is usually a bevel at the very edge and one has to get that nice and clean and even. Once you do that, you have a nice sharp knife. 
I brought over a bunch of my kitchen knives. I used the grinder on some, then used the sanding disk on the lathe to flatten the grind and get the blades into shape. I then sat down and used a heavy grind stone to rough a couple, but mostly used my diamond plate sharpening stone to get the blades to shape before running them on the strop. They were all nice and sharp. I then went and got mom’s kitchen knives and gave them the same treatment. One knife she was using was really dull. No edge at all. Now they are all really sharp. 
I had forgotten about some cleavers I have. One is really heavy but dull as an actor talking science. The bevel to the edge was rounded. I had tried to sharpen this thing several times and failed. I have used one of those knife sharpening things and it was too thick. By hand, there was just too much metal to remove. 
I put the big cleaver to the grinder and removed the roundness. I then put it to the sanding disk on the lathe. That is really sturdy sand paper. The grit is really hard and is well glued on. It did a really nice job on the knife blades. I got the cleaver edge well and then sat and worked it on the diamond stone. It really needs a lot more work, but this is the first time it has been sharp in likely a couple owners back. I think I got it at a yard sale.

As I was pushing my lathe back into place, mom noticed that one of the blocks holding the wheels was moving differently than the lathe was going. I will have to deal with that tomorrow. 

I will see what I do tomorrow. 


Year 19, Week 11, Day two (week 1001)
(January 17, 2000 was my first carving day.)
03-24-19 Sunday


I moved the lathe and one of the blocks holding the wheels came off. I removed everything from the lathe, including the motor, tool rest and tail stock. All the tools, all the wood. It was now fairly light. I drilled new holes and moved the bolts holding the blocks on both ends and screwed them in again. One bolt broke so I found a long screw and used that. They are on for now. I then reloaded the lathe. 
The motor is held in place by a single bolt to a fitting that slides in the ways of the lathe bed. The tightness of that bolt dictates how difficult it is to loosen the head to move it, rotate it, or take it off and especially how tight it is when locked down. You don’t want the motor to move away from the work. Something big and fast could be a real disaster. 
I had downloaded the instructions on the lathe a while back and it gave a specific torque setting to go by. If you don’t have a torque wrench, you move it a quarter turn and see how that works. I used to have two torque wrenches, but the pointer bars on both were bent so they would not move as required. 
When putting the motor on the lathe, I turned that nut a quarter turn. When it was on, It took a lot of pressure to lock it down, but it is not going to move. An eighth turn likely would have done it. That is one problem I thought I was having when working and that is now solved.

In the evening, I was getting ready to slice up a pork loin into steaks. I had a knife laying in the bottom of the sink as I was washing off the roast before taking it to the slicer to make into steaks. My finger lightly brushed the edge of the blade. It was a very tiny cut but it bled nicely. That knife is really sharp. I did well. This is one problem with having sharp knives laying around. They have to be set to the side properly before you do something else. I took care of the cut before I handled the meat again. It is nice to have a really sharp knife to work with. 
I am using the last meat slicer I bought and it works really nice. Being stainless steel, I later disassembled the slicer and stuck the whole thing in the dishwasher to clean up. Only the motor does not go in, which is why I like this kind of slicer. 

I have a lot of projects in mind but will have to see which I work on next week. 

1416
knives on pictures, one pictures shows  the knifes still attached, the other separated.

a close up of the two new knives.  with one of my old ones.

salt and pepper shaker. made with two attached pieces of wood and set into lathe on an angle.

two new blades with handles.

the four new blades. the second from the bottom will be more a utility blade unless I get into chip carving.

top knife is the last pointed knife I ever made. 
the second from the top is a knife Dad made.
the third from the top is one of my later knives.  that handle is BISHOPS WOOD.
four new knives. third from the bottom is pressure treated wood. I seemed to be missing the other one. 
second from the bottom was the one I broke and I will use that most likely for utility cutting.