Sunday, March 31, 2019

Year 19, Week 10, Day One (week 1000)

Year 19, Week 10, Day One (week 1000)
(January 17, 2000 was my first carving day.)
03-16-19 Saturday

heavy overcast that broke up some in the afternoon. 75 in the early morning, 79 in the afternoon. I felt driplets of mist every now and then during the day. I drove to pick up some lunch and when I came back, that fine mist came down hard enough to wet the road and was gone as fast as it came. It was dry the rest of the day until after the sun set. This weather report is brought to you by The Pompano Beach department Of Tourism.

We went to Granny’s Attic, which is a indoor collector yard sale. There was lots of jewelry and stuffies. A couple people had crochet. One was doing it there. She had some sheep with long threads sticking out as the wool. Cute but not what I was after. One woman in another section  had the nerve to display a cloth bag filled with yarn, with like six or seven skeins of yarn. No, I did not buy it. The thought, though, crossed my mind for a moment... They were nice colors.  We found one guy was sitting at an empty table and both mom and I, at different times, asked how much he was selling his wares. He had a couple specials which sounded good.  He got a kick out of it and played along with us. 
Somehow, I got out of there without anything. There was a doll with a really nice dress I considered for a moment. There was an popcorn air popper in the box. I forced myself to ignore that as I have two of them of that style. There was a crank egg beater. I came up with a great marketing strategy for the millennials. Attach a cheap phone on top of one of those crank egg beater. Tell them that they now have a high-tech crank-device.  Old and new technologies together.

When I got home, I napped for about half an hour. I really needed it and that did help, though I could have stayed longer.

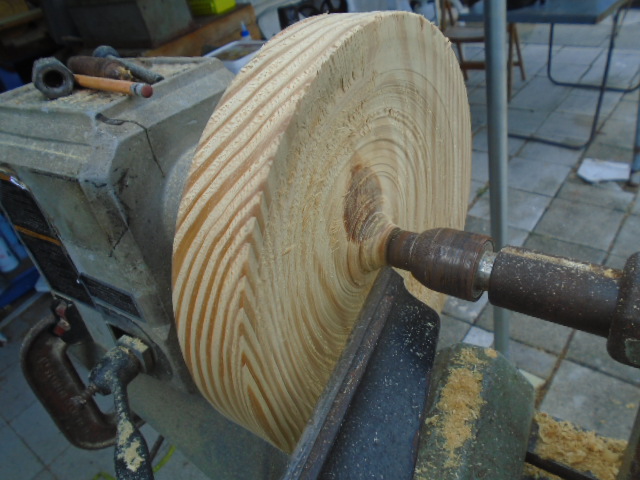
I went out back and pulled all sorts of stuff out, having a look at them. I decided to work on a bunch of platters I had made. Back years ago, I was practicing making platters so I could do a demonstration. These are the roughed out results of that practice. I mounted them on the lathe and sanded them more than they were. This wood warps really bad when you remove the excess wood. Part of what I was doing was trying to hide the places where the tool dug in after bouncing on a high warp. 
After I sanded them, I knocked off the center posts with a chisel, and then did some grinding and sanding. All need more finer sanding, but quite a few made good headway. I think I did like 8 of the 13 I have. Not bad. 

It is bad when you know you have something but cannot figure out where it is. You are not about to buy more but cannot do a project without it. 
Something I’ve been needing but not sure where it was, was I have a box of shop towels. These are disposable towels. What I want to do is what is called a wipe-on finish on some items. This is where you add varnish to the piece and rub it continuously until it is dry. No streaks, no drips and the finish is clean and even. These shop towels are just right for that. I found them after looking in the shed for a while. I had seen the box early on and read the word “Rags” as “Bags” and ignored it.

Mom picked up a Boston Butt roast and I sliced it up for her. It had a big bone in it so I have that in the freezer for stock some other time. I really need to take time and sharpen kitchen knives. Both mine and Mom’s. They have false teeth and basically gum things apart.

I will see what I do tomorrow.


Year 19, Week 10, Day Two (week 1000)
(January 17, 2000 was my first carving day.)
03-17-19 Sunday

Ground was wet early morning, solid clouds in the morning and sunny and clear all the rest of the day. 70 early morning 82 as the high. Light breeze some humidity. This weather report is brought to you by The Pompano Beach Department Of Tourism.

I had a file in the package for a lot of years. Every time I saw it, It said to me that it wanted to be a knife. I decided today would be the day. It was still in the package but the package to wet so there was a tiny bit of rust on the surface in a couple places.
I first ground the teeth off the edges. Then worked on removing the teeth from the surfaces. Removing the teeth is the first thing to do. A clean piece of metal is easier to work with. The whole blade should be smooth all over. One is not dealing with them when trying to sharpen or shape the blade. The problem with the grinder is the curve of the stone only really touches a small area of the metal. I got the worst of the teeth off but you could still see some impression on the surface. 
Now is when I was glad I made that sanding disk for the lathe. I put the tool rest almost touching the sandpaper and used the handle of a small turning tool to push against the blade as I sanded the surface of the blade. That did the job of cleaning the blade nice and flat.
I returned to the grinder and started shaping the blade . I measured for the main blade and used the grinder to make a tang in the middle of the file for the small blade so I would get two blades out of it. The end blade was to be shorter than the other with the file-tang. 
I used the grinder to start tapering the blades, work one side, flip it around and work the other one. I had the end blade quite good then started on the blade with the tang. I had to put on a glove because it was getting hot. I know I am supposed to quench the blade each time but I was being lazy. 
With the more common steel, if you get bluing from over heating, you have lost the temper of the blade. It becomes softer. Now with a lot of the modern files, they case harden them, which is some form of chemical bath, that makes the surface hard but the metal below the surface is still soft. This makes them hard but flexible. Not likely to crack or shatter. If I really wanted to do things right, I should re-temper the blade. That is not worth the trouble. 
Metal is heat-treated to give it the rigidity and hardness needed for a project . They can control how hard the metal is or how flexible it is. If you heat the metal really hot and quench it, it will have maximum hardness, but will be exceedingly brittle. If you don’t harden the metal, it will be really flexible, and even bend instead of breaking, but the surfaces can be deflected or worn away easily because it is soft. The usual heat treating method is to get the metal really hot and quench if quickly. Then reheat it to a certain point and stop the heating where the metal has the hardness needed. One can do this by setting it in an oven for that exact temperature, or you can heat the thick part of the blade and quench it when the edge reaches a certain temperature. Steel changes color according to the temperature so they aim for the edges to be golden or straw colored. Bringing a steel to blue, take out all the temper from the metal so it will be really soft.
There are steel compounds that make them heat tolerant so that if you blue the metal, the temper stays with in the metal. In wood turning, these are usually referred to high speed steel. They can be used at speeds that create a lot of heat and hold their edge nicely.
I got both blades close to what they needed to be, then turned to my sanding disk again so I could get the angle even and the surfaces clean. 
Years ago, I used to make knives with fine points like my dad taught me. They go through gloves with ease. I accidentally made a knife with a square end and found I loved it. I have made my knives like that ever since. I also make my blades so the back of the blade is about the same thickness as the originating file, if I use a small file. This allows me to apply pressure on the blade if I need control near the edge. 

I then started making handles for them. Previously, I had a wood called BISHOPS WOOD that is strong and hard. They made good handles. I decided to use BLACK WALNUT this time. The black walnut I have is old and have suffered a lot of weather. Some parts of the wood shows decay. I cut some pieces and made handles in the shape I like. Most of the commercial handles are narrow like a regular knife’s blade. My dad taught me to make them wide so that the pressure pushing down is spread out over a larger area. I made a pair of handles roughly in the shape I like and cut a slot with the band saw for the blade, then drilled out the handle for the tang. Then I became a combination of Laurel and Hardy plus the Three Stooges. 
I cracked one handle badly and the other had problems too. I pried the blade with the long tang out using a hammer and then made another pair of handles. I was driving the blade in and it was going in wrong. I tried to pry the blade out again and broke the blade, I ground another tang on the broken end and after a couple more tries, I finally got handles for the two actual blades. The one in the handle that broke, I left that in there, and decided I could use it like a utility knife.

There is a turning club meeting this week. I hope to have some things to show.

I will see what I do next weekend. 

1793
the platters before I started cleaning them up. I never took an after picture.
the original file I started with for the knife
the file cleaned up
the tang for second knife cut in
another view of the two blades still attacfhed
blades separated with one of m old knifes as an example.
the rough handles and my knife as comparison.
One blade in , another handle glued because it cracked.


Sunday, March 17, 2019

Year 19, Week 09, Day One (week 999)

Year 19, Week 09, Day One (week 999)
(January 17, 2000 was my first carving day.)
03-09-19 Saturday

Partly cloudy some sun, a few showers early morning just enough to get you scrambling but not really get you wet before it was gone. 64 early morning, 81 by noon, light breeze and plenty of sunshine. This weather report is brought to you by The Pompano Beach Department Of Tourism.

FRIDAY

A couple months ago, Harbor Freight had a sidewalk sale, and I bought a sidewalk. This time they had a parking lot sale and I bought a parking lot. There were a couple things I really wanted and this gave me the chance to pick some things up. I did not intend to come home with all that I ended up with. A small shopping cart sat right near where I parked so I rescued it. I intended to leave it with its mommy. As I went through the stuff on display outside, a few things ended up in the cart. I then went through the store and more stuff ended up in the cart. There was no way I could carry all that in my arms so I kidnaped the cart and emptied the contents into my truck and left the cart in the parking lot again, not far from where I found it. 

Saturday

I got out back, laid out my Friday finds so mom could see them. I decided to work on a platter. I took out a blank and mounted it in the lathe. This time I used my sanding disk to back it up instead of the chuck. The chuck does have some advantages. If I ran the boards through a thickness planer to flatten them, things would be easier in this project. I am using commercial two by yellow pine that has been around for a lot of years and the blanks have been cut and trimmed for a lot of years also. 
From experience, I learned that you do the inside of the platter first. Yellow pine will move, (bend or cup) as you remove the wood because stresses are released so, because less wood is removed from the inside, it is better to do the inside first. 
I was working with the blank that I had knocked the corners off a couple weeks ago. It was a good piece of wood to work with.
Once I got the bottom, the flat part of the plate as deep as I felt it should go, I did some clean up cuts and then sanded it. 
I took the sanding disk off and put the chuck back on. The sanding disk is smaller than the plate. The chuck, opened wide, is still slightly smaller than the flat center so it will hold it flat and in place. 
I had previously marked the center by running lines corner to corner before knocking off the corners. I found they were a little off. I ended up measuring across it and marking the center of the measurement, turning a little doing it again. I finally found what was close to center. Even so I was slightly off. A tiny bit off shows up big. I rounded the outside again and then worked on the back of the platter. I always inset the center and make a ring for the plate to sit on, then taper the rest of the platter to be fairly close to the angle of the front of the platter. 
I would cut a little bit, then I would hear the thump, thump, thump. I would level it out then I would get the thumping  again. I got it as thin as I figured it should be and as close to level as It was going to get, and I did a little clean up cuts and sanded it. 
It is not the best I have ever done, but it is not the worst. It was a lot of fun to be creating something and getting results. 
I piled up the sawdust and photographed it to show what about 1 1/2 inches wood looks like when converted into shavings. 

By then I had done enough and needed to go onto some non-project activities.

I will see what I do tomorrow.


Year 19, Week 09, Day two (week 999)
(January 17, 2000 was my first carving day.)
03-10-19 Sunday

There was drips on my windshield but the day  otherwise sunny with light high clouds and lower puffs migrating across the sky. Morning temps were 74 very early, 77 when I hit the road and 81 in the afternoon with a nice breeze keeping things cool This weather report is brought to you by The Pompano Beach Department Of Tourism.

I was kind of excited by the results I had yesterday. Years ago, I had practiced making platters with the intent of demonstrating the process of making them. Life got in the way and never did the demonstration. I never really got back into making the platters. I have a whole bunch of the platters stacked up waiting for the next step. The platters were initially rough turned but never cleaned up, sanded or have the center post removed. 
Today, I decided to do some clean up on them. One by one, I mounted them in the lathe and sanded them with 40 grit belt sander paper. Some I took out my turning tools in an attempt to clean them up some more. I did pretty good on most of them, though all will need much more work. The fact that the wood has moved/warped made this a tough project. 
My lathe has an adjustable pulley. I turn a knob and the lathe will speed up or slow down, depending on how wide the pulley is. On the slowest, I get some slippage as I need a new belt. This one is quite worn. (I did a quick look on line a couple weeks ago and the belt is not available from Delta any more) I made use of the slippage at times because the pressure of the sandpaper on the wood would slow the spin down. This allowed the sandpaper to follow the curve of the wood better, getting some bad spots better.
I went through each platter, sometimes using tools to clean some spots, other times just sandpaper. Since I have yet to cut the posts off, I figured some places will require more dedicated sanding at the same time I remove the remains of the posts. 
When I was done, I had 13 fairly good platters. There was one platter than looked like it was not going to be rescued. I figured I might toss it later so I left it till last.  I finished rough cleaning the other platters and decided to work on this bad one. 
There was a knot that the middle had broke out of, and there were deep gouges where the wood warped badly and the tool dug in. I used a scraping cut to even out the gouges some, and then sanded with the 40 grit sandpaper. I had not expected it to be better when I was done. It still is not close to being good, but it is a tiny bit better than it was before. 
That gives me 14 platters to work with. Really only 13.

One problem of power sanding, is that each method does its own damage. The lathe generally has parallel grooves going around the piece. Sanding with a drill leaves circular gouges, the belt sanders leaves straight gouges, the dremmel leaves little dimple marks. 
The question is as to whether the damage caused by the power tool will be less than the damage you are trying to clean up. One ends up hand sanding when all is said and down. These platters are going to be a multi weekend project and I do not know how excited I will be about it next time I get out there. I usually work on what excites me and it might not be the project I worked on before.

Last week I had started a cup before I cleaned up. It was still in the chuck when I needed to use the chuck for the platters. I took it off and decided I’m not really happy with it. It could well migrate into the garbage can. 

I will see what I do next weekend

1404


two blanks, the upper one has alien eyes and if it was clean, you would see sort of an alien face.
the bottom one was what I ended up turning. I tried to work to keep the knot centered.

platter for cutting in the face of the plate.

started hallowing it.

the top of the platter, the nott is at the base of the post in the center

the bottom of the platter

the edge view of the platter showing how much cup I added to it.

a close up of the knot at the post from the top

a view of the knott from the base of the platter.

some chatter caused by the cupping of the wood. the  gouge is kicked up slightly then comes back down hard on the wood. 

the wood removed from the two by nine disk. each of those stones is a foot square.

13 of the platters I sanded on, on Sunday. 
two lower right platters were partially finished a long time ago.
The lowest right platter was made from 3/4 thick wood.


Saturday, March 9, 2019

Year 19, Week 08, Day One (week 998)

Year 19, Week 08, Day One (week 998)
(January 17, 2000 was my first carving day.)
03-02-19 Saturday

68 early morning, 75 at about nine, 85 late afternoon, light breeze with gusts you could just feel, blue skies except low puffs over the everglades and the ocean. We got some good heavy showers during the week so Mom did not have to water her plants this weekend. This is supposed to be our dry season and we have not had many dry weeks this winter.  This weather report is brought to you by The Pompano Beach Department Of Tourism.

We found one yard sale. I am not sure why, other than the cost, I picked up one of those pumps to inflate pool floats. It seemed the thing to get when I handed over the dollar but now, I am not totally sure. The box looks unopened.

I went out back. I had about 20 projects flipping through my mind. I had three wooden chairs that are nice but the joints were coming apart. I glopped water resistant glue all over the joints, and wiggled and pounded them back into position.  Two of the chairs seem like they might stay put, but one is still wobbly (the one I repaired a while back). I will have to check more joints to see what condition they are in.
My next project was to check out some baggies of stuff I had. I have some fabric that is for decorating project s. One brown plaid fabric was used as scarves on some snowmen I made. I did not realize I had some felt in green and white. The other day I almost picked up a baggy of cloth but mom talked me out of it. 
I went over some ornament blanks. I have a couple weekends of carving in those. A couple I no longer have copies of, so carving them would be something to do. Some of the ornaments have been started and just need some time to complete them.

I forgot to mention it, but a few weeks ago, I broke one of my turning tools. It was basically a quarter inch square rod (high speed steel) in a handle. The end was cut on an angle that was square to the rod. It worked pretty good until I got a catch and it snapped in half. It was like two weekends later I found the end that broke off. It was not where I looked for it based on the sound when it hit the ground. 
Today, I took out a tool handle I have. It was made from a TIRE BUDDY” which was a really long rod on a handle for installing and removing tires. My brother bore out the end and added an allen screw into it. I took that square tool end and stuck it into the hole in the end of the handle and tightened the screw. I now have access to that tool again by using it as a bit. 
The handle is nice but there is only about 3 inches of the square rod sticking out. That is really not enough for use. The handle itself gets in the way of the tool rest. I might sharpen it anyway. As another option, I have no idea how I would get the rod out of the handle. I happen to have another of the same tool but the end is rounded into a bull nose. I could grind that on an angle if I needed to. I do have a mate to that tool where the end is on the same angle, but sharpened in a radius. It would be nothing to grind away the radius and have the same tool again. 
I sharpened a circular bit (almost like a tapered washer). I have it in a curved handle that is used for hollowing out the interior of vases, reaching around the mouth of the vase and getting into shoulder. This bit really needed to be sharpened but I was not totally sure how to sharpen it. I then decided to use my dremel, but not before I found that the screw was too big for the dremel chuck, so I grabbed a drill and clamped the screw into the jaws of the drill, with the bit shoved against the jaws so it would not spin on the screw (much). I spun ran the drill at full speed and held my diamond hone against the edge. When that was not doing it right (not enough surface touching), I took a grindstone bit out of my dremel box and held that against the edge top and bottom and finally got the edge sharp. 

I addressed the vase I started last weekend. I sharpened a couple tools and used that bit in the tool handle, two bowl gouges, that circular bit tool, and hollowed the vase out. There is one little spot inside on the side that is not great, but I decided it was not worth getting rid of. I then sanded it. I used 40 grit sandpaper, then 80, 100, 150, 250 and stopped with 400, which I had found in my digging. It is not as good as it should be (likely really only sanded to 100 grit quality), but that is a good start. I then sprayed it with spray poly a few times. Tomorrow I will give it a good sanding and add more coats of varnish. 
The knots that had caught my attention, which was why I chose that piece, were gone. Apparently, they started later in the life of the tree/branch so did not go in very far.  I dremmelled out the hole caused by a dead branch, mainly to clean it up some, then drove in a dowel. I worked some glue into it and then worked in some shavings into the gaps between the dowel and the hole since the hole was not perfectly round. I did that several times as I shaped and cleaned it till the wood looks like it fits around the dowel nicely. It the dowel does not look quite right as it is of a different wood but it does not look bad. 

The way sandpaper is made, is they have a set of screens and they pour the sand through the screens. The screens are classified as how many threads of screen to the inch. Whatever goes through a 60 line screen but not an 80, is then classified as is 80 grit. The grit goes through an 80 but not the 100 line screen is 100 grit. 
Now manufacturers might use thicker or thinner grid lines (they don’t use actual cloth screens any more) and the types of stones used for the grit, the type of glue, and the backing can be quite different between manufacturers. Because of this, it is best to use the set of grits by one manufacturer when sanding. 
Sandpaper works by having the edges of the grit scrape (cut into) the material. When the whole surface has the same level of roughness (removing the tool marks or the lines caused by the grit of the previous sand paper) then the surface is said to be sanded. You then go to the next grit. As they get finer, the grooves become smaller and smaller, and less and less visible until you can end up with a fine polish on the surface.
Some sandpaper has lightly glued grit while others are almost impossible to remove. The grit on some sandpaper is designed to do the scraping, and as it gets dull, then come off the backing so a fresh piece of grit edge can do the work. Other sand papers might be glued on tight so it will do its cutting for a very long time (especially for belt and disk sanders). Generally, the harder the material that you are sanding (like steel), the more likely the sandpaper will lose grains as it is being used, as the material dulls them quickly.. 
I was using sandpaper from various manufacturers and composition to do my sanding today. I used whatever I got my hands on. 

Once I had the little vase to a somewhat acceptable level, I put another piece of wood on the lathe. This was longer and the ends were on angles to each other. I decided to make use of the strongest angle end as the top of the project simply because it was interesting. It was also slightly wider than the other end and had some decay in the very center. I put the larger end into the chuck first and made a tenon on the smaller end. Because of the decay in the very center,  the drive spur dug in nicely as I worked (cranking the tail stock so it kept pressure on the wood). I then turned the wood around and put the tenon into the chuck. The hole by the drive spur assisted in hallowing out the inside. 
The moment I started it to spin, I decided I would TRY a natural edged goblet. When you turn like Godzilla, you end up losing some of the natural edge in the process. Even so, I tried to be careful. I first cut in beneath the lip and then partially formed the bowl to give me something to work with. I then started hallowing. I worked carefully, shaping it rounding it trying to get a nice clean cut. I then sanded it with all sorts of grits getting it passable (for now).
I then started shaping the outside. The idea is to get the outside and inside close enough together to make it feel thin, delicate.

In wood turning, what you are selling is air. It is true. A block of wood sells for a ten bucks. Make a thick bowl, and it costs a thirty bucks. Make it really thin and it is worth maybe 75 to 100 bucks. Pierce it and decorate it and it becomes worth several thousands. You are simply selling air... Make your as thin and delicate as possible if it is decoration or make the pieces much thicker if it is to be used.  

I kept working the outside of the bowl of the goblet. I had the bottom thicker than I wanted but had to be careful as I had the stem getting thin. It has the pith running through it and that weakens the wood a lot so you have to leave the stem thicker than you would like. Some guys, using the right kind of wood, will make USB WIRE thin stems really tall. I cannot do that yet.  
I did a lot of sanding, some extra tool work to clean some tear out, then some more sanding until I decided I was not going to get it any better. I then worked on the stem and sliced away the wood to a similar thickness down to the base and sanded. I decided to save the making of the base for tomorrow. I was beginning to feel the day. 
The natural edge was not too bad, but was not the best. One small piece of bark remained and the rest of the edge was rough which I will proclaim is the natural edge. 
I am surprised at how much stuff ends up getting pulled out for just a couple simple projects. It also takes twice as long to get it put back in place than it took to get it all out. 

I likely will finish the goblet. I also was asked to make some wooden feet for Mom’s foot stool. 

I will have to see what I do tomorrow.


Year 19, Week 08, Day two (week 998)
(January 17, 2000 was my first carving day.)
03-03-19 Sunday

70 early morning, 85 late afternoon. Blue sky with high clouds, some puffs over the Everglades, a light breeze and a little humidity.  Aren’t you also getting tired of the cold of  winter, so you can complain about how hot it is in the summer?  I am... This weather report is brought to you by the City Of Pompano Beach Department of Tourism.

I got out back and started setting up to work on my various projects when my brother arrived. He was reading an old book on files, and telling me about what he was reading, so he took out his phone and looked up some information on files. He did not know there was that much on files. I won’t tell about what he was saying as it would be better for you to look it up. I will just say that they had files made of stone for working with stone, thousands of years BC.
I started the lathe on the goblet. Other than a little bit more sanding, the main project I was after was to separate the base from the waste wood. I first took a “sheet metal” parting-tool to the work table and spent time cleaning it and sharpening it. I wanted to reduce as much friction as possible and make sure it would cut nicely.
I intended to use it to cut a thin slot in the base of the goblet on an angle so it would go up toward the center. Just the rim would be on the table. I knew I had to be very careful. I did not want to waste the wood. I am not sure what happened. I might have been distracted for a moment, I broke out part of the edge I was trying to save. I then turned to plan N (other plans from A to M were used up). I made a couple bad decisions such as how I corrected the base after I broke out the edge. I put in a step edge and should have just made that wood part of the stem, or try to make it a slope to the stem. 
I took the goblet off and went to the disk sander. I removed all the wood until I had it about the thickness I was after. Nice to have good sandpaper on that disk. I then had to sit and touch the edges of the base as I did not get it as clean as I should have. More time on the lathe and the less time sitting and working. I got it to the point where I decided to stop. After doing a light sanding on the little vase,  I gave the goblet and the vase from yesterday another shot of spray varnish. They both got several coats of varnish but will need a lot more.

Mom has a foot stool she likes. It is basically two pipes bent in a curve on each end with a sheet metal connected to between them. The bottoms of the pipes become the feet. She had rubber feet on it, but over time, the pipe cut through the rubber feet. She was afraid the pipes would damage the rug or the carpet beneath it.. 
A couple weeks ago, I made feet for some four footed canes I have. I learned a lot from the attempts. I decided to use the same technique. First I cut some square blocks, and then drilled in the center with the proper sized Forsner bits. One thing to keep in mind is that rubber feet are actually made to a slightly smaller diameter than the pipe or rod they are fitting to. That way there is some stretch to hold them in place. 
I then went to the bandsaw and cut the corners off. I then took a different block of wood and made a peg to fit the holes I drilled. There is a way to make them a suction fit, but I have not worked out that skill. I have to depend on the friction of the block at the base of the peg to hold it tight, that and the tail stock applying pressure to it. It is never perfect. 
I used the square rod in the interchangeable handle and found that if I tip the cutting edge to a sharp angle to the side, the bit would not dig into the corners of the wood near as much. My first batch was yellow pine and I had several break. I ended up with two that were usable. I touched the bottom corner to chamfer it. I later figured out that this was not necessary. I made two more useable feet in white wood. I had to clean up the tops and bottoms of the feet one yellow pine had chip out on top. I sanded the top and bottom flat, then I rolled it against the sander to clean up the outside of the feet that the sandpaper on the lathe did not do a good job on. Finally I chamfered the edges simply by rolling them against the sander on an angle. It cleaned them up nicely. 
I finally got the foot rest and had to make the holes a little bigger with the dremmel to fit the pipes. The platform had a bend in it where too much weight was added. I flattened it out but it would not take as much weight. It simply has the edge bent down on the ends to give it stiffness. The bent down edge was cracked where it was bent. I straightened it out with putting it on the corner of the work bench and pushing down with my weight. Several times and it was straightened out quite a bit.
Mom was really happy with the results. The wood feet don’t look horrible and it solved all the problems. If she wanted them to look a little better, she could add a little bit of paint. 

I had some more time and a little more energy. I grabbed another piece of wood. It had where a couple branches were cut off and was coming out. I decided to do what is called a banana bowl kind of design. A true banana bowl is where you take a longer piece of wood an hollow it out as the ends spin around. The center becomes really low, near the bottom of the branch, and the ends are near the top of the branch. You do the same on the backside. A long narrow bowl that will fit a banana,... 
Quickly, it was not going to be that as I removed the cut ends, it was becoming simply a vase. I used that square rod in the handle to hollow it out. I had the tool rest holding it in place so I had a post in the center. I was able to cut in quite a bit and have most of the depth before I stopped. It will require a lot of other work. I just wanted to make something. The wood was there and it came out of the scrap wood really quick. What it actually will be, the wood will tell me next weekend. It is not what I was after. I see that the branch does not show on the inside which changes some design ideas. I will make more decisions next weekend.

I accomplished a lot in the short time I was able to work. It was a lot of fun. I have a sense of accomplishment. I will do some sanding and varnishing of the goblet and vase over the week. Neither might be done next weekend, but they will be closer. One thing the varnish does is that it sets the outside grain so that when it is sanded again, it will make it smoother than it would otherwise. Also the varnish fills in the spaces between the surface fibers. 

I was about to leave and decided to take advantage of the daylight and my time. I returned out back of mom’s house with the cane that I had made wooden feet for two weeks ago. I removed the wooden feet, one had to be tapped a couple times as it was too tight. I then used what I learned today, and moved the tool cart out of the way, which I have to do to get to the disk sander. And sanded the feet I had made. 
I sanded the outside to clean up the tear out on the outside, the bottoms and tops were made flat, and then I put the bottom and top at an angle to the grinder. The bottom I kind-of rounded them a little. The tops I removed the sharp edges and they were not totally rounded. One was bigger around than the others so I sanded the outside until it was closer to the others and corrected the top and bottom again. 
My original idea was to have them tapered to the hole like most rubber feet you see. I could still do that but I decided just to make them less blocky than they were. I am slowly learning how to do these. I have a couple more four legged canes that need feet and I will, over time, make more for them. I figure each one will be better than the previous one. 
A good clean sandpaper in a fast sander does wonder to clean up mistakes and make new ones. There are those who would simply use the sandpaper to do the rounding that I did with the lathe. It might even be faster. I am trying to learn some techniques that can be used for other projects so it is worth my effort to try these on the lathe. 

I do need to spend time and sharpen my tools PROPERLY. I have a long ways to go. Many of the tools were pulled out and then stopped being used, because they were dull. 

I will see what I accomplish next weekend.

3656


goblet on lathe

goblet on lathe note thick base

the tools I used. the long one is made to use interchangeable bits. 
It used to be a TIRE BUDDY

the vase with some varnish and the newly made goblet
note the stepped base. that is a no-no

A piece of wood I decided to turn. see the knot on the bottom of the picture? 
that was what I was after
I had already made a tenon when I took this picture.

partially turned not looking good.

partially turned, rotated around.