(January 17, 2000 was my first carving day.)
03-02-19 Saturday
68 early morning, 75 at about nine, 85 late afternoon, light breeze with gusts you could just feel, blue skies except low puffs over the everglades and the ocean. We got some good heavy showers during the week so Mom did not have to water her plants this weekend. This is supposed to be our dry season and we have not had many dry weeks this winter. This weather report is brought to you by The Pompano Beach Department Of Tourism.
We found one yard sale. I am not sure why, other than the cost, I picked up one of those pumps to inflate pool floats. It seemed the thing to get when I handed over the dollar but now, I am not totally sure. The box looks unopened.
I went out back. I had about 20 projects flipping through my mind. I had three wooden chairs that are nice but the joints were coming apart. I glopped water resistant glue all over the joints, and wiggled and pounded them back into position. Two of the chairs seem like they might stay put, but one is still wobbly (the one I repaired a while back). I will have to check more joints to see what condition they are in.
My next project was to check out some baggies of stuff I had. I have some fabric that is for decorating project s. One brown plaid fabric was used as scarves on some snowmen I made. I did not realize I had some felt in green and white. The other day I almost picked up a baggy of cloth but mom talked me out of it.
I went over some ornament blanks. I have a couple weekends of carving in those. A couple I no longer have copies of, so carving them would be something to do. Some of the ornaments have been started and just need some time to complete them.
I forgot to mention it, but a few weeks ago, I broke one of my turning tools. It was basically a quarter inch square rod (high speed steel) in a handle. The end was cut on an angle that was square to the rod. It worked pretty good until I got a catch and it snapped in half. It was like two weekends later I found the end that broke off. It was not where I looked for it based on the sound when it hit the ground.
Today, I took out a tool handle I have. It was made from a TIRE BUDDY” which was a really long rod on a handle for installing and removing tires. My brother bore out the end and added an allen screw into it. I took that square tool end and stuck it into the hole in the end of the handle and tightened the screw. I now have access to that tool again by using it as a bit.
The handle is nice but there is only about 3 inches of the square rod sticking out. That is really not enough for use. The handle itself gets in the way of the tool rest. I might sharpen it anyway. As another option, I have no idea how I would get the rod out of the handle. I happen to have another of the same tool but the end is rounded into a bull nose. I could grind that on an angle if I needed to. I do have a mate to that tool where the end is on the same angle, but sharpened in a radius. It would be nothing to grind away the radius and have the same tool again.
I sharpened a circular bit (almost like a tapered washer). I have it in a curved handle that is used for hollowing out the interior of vases, reaching around the mouth of the vase and getting into shoulder. This bit really needed to be sharpened but I was not totally sure how to sharpen it. I then decided to use my dremel, but not before I found that the screw was too big for the dremel chuck, so I grabbed a drill and clamped the screw into the jaws of the drill, with the bit shoved against the jaws so it would not spin on the screw (much). I spun ran the drill at full speed and held my diamond hone against the edge. When that was not doing it right (not enough surface touching), I took a grindstone bit out of my dremel box and held that against the edge top and bottom and finally got the edge sharp.
I addressed the vase I started last weekend. I sharpened a couple tools and used that bit in the tool handle, two bowl gouges, that circular bit tool, and hollowed the vase out. There is one little spot inside on the side that is not great, but I decided it was not worth getting rid of. I then sanded it. I used 40 grit sandpaper, then 80, 100, 150, 250 and stopped with 400, which I had found in my digging. It is not as good as it should be (likely really only sanded to 100 grit quality), but that is a good start. I then sprayed it with spray poly a few times. Tomorrow I will give it a good sanding and add more coats of varnish.
The knots that had caught my attention, which was why I chose that piece, were gone. Apparently, they started later in the life of the tree/branch so did not go in very far. I dremmelled out the hole caused by a dead branch, mainly to clean it up some, then drove in a dowel. I worked some glue into it and then worked in some shavings into the gaps between the dowel and the hole since the hole was not perfectly round. I did that several times as I shaped and cleaned it till the wood looks like it fits around the dowel nicely. It the dowel does not look quite right as it is of a different wood but it does not look bad.
The way sandpaper is made, is they have a set of screens and they pour the sand through the screens. The screens are classified as how many threads of screen to the inch. Whatever goes through a 60 line screen but not an 80, is then classified as is 80 grit. The grit goes through an 80 but not the 100 line screen is 100 grit.
Now manufacturers might use thicker or thinner grid lines (they don’t use actual cloth screens any more) and the types of stones used for the grit, the type of glue, and the backing can be quite different between manufacturers. Because of this, it is best to use the set of grits by one manufacturer when sanding.
Sandpaper works by having the edges of the grit scrape (cut into) the material. When the whole surface has the same level of roughness (removing the tool marks or the lines caused by the grit of the previous sand paper) then the surface is said to be sanded. You then go to the next grit. As they get finer, the grooves become smaller and smaller, and less and less visible until you can end up with a fine polish on the surface.
Some sandpaper has lightly glued grit while others are almost impossible to remove. The grit on some sandpaper is designed to do the scraping, and as it gets dull, then come off the backing so a fresh piece of grit edge can do the work. Other sand papers might be glued on tight so it will do its cutting for a very long time (especially for belt and disk sanders). Generally, the harder the material that you are sanding (like steel), the more likely the sandpaper will lose grains as it is being used, as the material dulls them quickly..
I was using sandpaper from various manufacturers and composition to do my sanding today. I used whatever I got my hands on.
Once I had the little vase to a somewhat acceptable level, I put another piece of wood on the lathe. This was longer and the ends were on angles to each other. I decided to make use of the strongest angle end as the top of the project simply because it was interesting. It was also slightly wider than the other end and had some decay in the very center. I put the larger end into the chuck first and made a tenon on the smaller end. Because of the decay in the very center, the drive spur dug in nicely as I worked (cranking the tail stock so it kept pressure on the wood). I then turned the wood around and put the tenon into the chuck. The hole by the drive spur assisted in hallowing out the inside.
The moment I started it to spin, I decided I would TRY a natural edged goblet. When you turn like Godzilla, you end up losing some of the natural edge in the process. Even so, I tried to be careful. I first cut in beneath the lip and then partially formed the bowl to give me something to work with. I then started hallowing. I worked carefully, shaping it rounding it trying to get a nice clean cut. I then sanded it with all sorts of grits getting it passable (for now).
I then started shaping the outside. The idea is to get the outside and inside close enough together to make it feel thin, delicate.
In wood turning, what you are selling is air. It is true. A block of wood sells for a ten bucks. Make a thick bowl, and it costs a thirty bucks. Make it really thin and it is worth maybe 75 to 100 bucks. Pierce it and decorate it and it becomes worth several thousands. You are simply selling air... Make your as thin and delicate as possible if it is decoration or make the pieces much thicker if it is to be used.
I kept working the outside of the bowl of the goblet. I had the bottom thicker than I wanted but had to be careful as I had the stem getting thin. It has the pith running through it and that weakens the wood a lot so you have to leave the stem thicker than you would like. Some guys, using the right kind of wood, will make USB WIRE thin stems really tall. I cannot do that yet.
I did a lot of sanding, some extra tool work to clean some tear out, then some more sanding until I decided I was not going to get it any better. I then worked on the stem and sliced away the wood to a similar thickness down to the base and sanded. I decided to save the making of the base for tomorrow. I was beginning to feel the day.
The natural edge was not too bad, but was not the best. One small piece of bark remained and the rest of the edge was rough which I will proclaim is the natural edge.
I am surprised at how much stuff ends up getting pulled out for just a couple simple projects. It also takes twice as long to get it put back in place than it took to get it all out.
I likely will finish the goblet. I also was asked to make some wooden feet for Mom’s foot stool.
I will have to see what I do tomorrow.
Year 19, Week 08, Day two (week 998)
(January 17, 2000 was my first carving day.)
03-03-19 Sunday
70 early morning, 85 late afternoon. Blue sky with high clouds, some puffs over the Everglades, a light breeze and a little humidity. Aren’t you also getting tired of the cold of winter, so you can complain about how hot it is in the summer? I am... This weather report is brought to you by the City Of Pompano Beach Department of Tourism.
I got out back and started setting up to work on my various projects when my brother arrived. He was reading an old book on files, and telling me about what he was reading, so he took out his phone and looked up some information on files. He did not know there was that much on files. I won’t tell about what he was saying as it would be better for you to look it up. I will just say that they had files made of stone for working with stone, thousands of years BC.
I started the lathe on the goblet. Other than a little bit more sanding, the main project I was after was to separate the base from the waste wood. I first took a “sheet metal” parting-tool to the work table and spent time cleaning it and sharpening it. I wanted to reduce as much friction as possible and make sure it would cut nicely.
I intended to use it to cut a thin slot in the base of the goblet on an angle so it would go up toward the center. Just the rim would be on the table. I knew I had to be very careful. I did not want to waste the wood. I am not sure what happened. I might have been distracted for a moment, I broke out part of the edge I was trying to save. I then turned to plan N (other plans from A to M were used up). I made a couple bad decisions such as how I corrected the base after I broke out the edge. I put in a step edge and should have just made that wood part of the stem, or try to make it a slope to the stem.
I took the goblet off and went to the disk sander. I removed all the wood until I had it about the thickness I was after. Nice to have good sandpaper on that disk. I then had to sit and touch the edges of the base as I did not get it as clean as I should have. More time on the lathe and the less time sitting and working. I got it to the point where I decided to stop. After doing a light sanding on the little vase, I gave the goblet and the vase from yesterday another shot of spray varnish. They both got several coats of varnish but will need a lot more.
Mom has a foot stool she likes. It is basically two pipes bent in a curve on each end with a sheet metal connected to between them. The bottoms of the pipes become the feet. She had rubber feet on it, but over time, the pipe cut through the rubber feet. She was afraid the pipes would damage the rug or the carpet beneath it..
A couple weeks ago, I made feet for some four footed canes I have. I learned a lot from the attempts. I decided to use the same technique. First I cut some square blocks, and then drilled in the center with the proper sized Forsner bits. One thing to keep in mind is that rubber feet are actually made to a slightly smaller diameter than the pipe or rod they are fitting to. That way there is some stretch to hold them in place.
I then went to the bandsaw and cut the corners off. I then took a different block of wood and made a peg to fit the holes I drilled. There is a way to make them a suction fit, but I have not worked out that skill. I have to depend on the friction of the block at the base of the peg to hold it tight, that and the tail stock applying pressure to it. It is never perfect.
I used the square rod in the interchangeable handle and found that if I tip the cutting edge to a sharp angle to the side, the bit would not dig into the corners of the wood near as much. My first batch was yellow pine and I had several break. I ended up with two that were usable. I touched the bottom corner to chamfer it. I later figured out that this was not necessary. I made two more useable feet in white wood. I had to clean up the tops and bottoms of the feet one yellow pine had chip out on top. I sanded the top and bottom flat, then I rolled it against the sander to clean up the outside of the feet that the sandpaper on the lathe did not do a good job on. Finally I chamfered the edges simply by rolling them against the sander on an angle. It cleaned them up nicely.
I finally got the foot rest and had to make the holes a little bigger with the dremmel to fit the pipes. The platform had a bend in it where too much weight was added. I flattened it out but it would not take as much weight. It simply has the edge bent down on the ends to give it stiffness. The bent down edge was cracked where it was bent. I straightened it out with putting it on the corner of the work bench and pushing down with my weight. Several times and it was straightened out quite a bit.
Mom was really happy with the results. The wood feet don’t look horrible and it solved all the problems. If she wanted them to look a little better, she could add a little bit of paint.
I had some more time and a little more energy. I grabbed another piece of wood. It had where a couple branches were cut off and was coming out. I decided to do what is called a banana bowl kind of design. A true banana bowl is where you take a longer piece of wood an hollow it out as the ends spin around. The center becomes really low, near the bottom of the branch, and the ends are near the top of the branch. You do the same on the backside. A long narrow bowl that will fit a banana,...
Quickly, it was not going to be that as I removed the cut ends, it was becoming simply a vase. I used that square rod in the handle to hollow it out. I had the tool rest holding it in place so I had a post in the center. I was able to cut in quite a bit and have most of the depth before I stopped. It will require a lot of other work. I just wanted to make something. The wood was there and it came out of the scrap wood really quick. What it actually will be, the wood will tell me next weekend. It is not what I was after. I see that the branch does not show on the inside which changes some design ideas. I will make more decisions next weekend.
I accomplished a lot in the short time I was able to work. It was a lot of fun. I have a sense of accomplishment. I will do some sanding and varnishing of the goblet and vase over the week. Neither might be done next weekend, but they will be closer. One thing the varnish does is that it sets the outside grain so that when it is sanded again, it will make it smoother than it would otherwise. Also the varnish fills in the spaces between the surface fibers.
I was about to leave and decided to take advantage of the daylight and my time. I returned out back of mom’s house with the cane that I had made wooden feet for two weeks ago. I removed the wooden feet, one had to be tapped a couple times as it was too tight. I then used what I learned today, and moved the tool cart out of the way, which I have to do to get to the disk sander. And sanded the feet I had made.
I sanded the outside to clean up the tear out on the outside, the bottoms and tops were made flat, and then I put the bottom and top at an angle to the grinder. The bottom I kind-of rounded them a little. The tops I removed the sharp edges and they were not totally rounded. One was bigger around than the others so I sanded the outside until it was closer to the others and corrected the top and bottom again.
My original idea was to have them tapered to the hole like most rubber feet you see. I could still do that but I decided just to make them less blocky than they were. I am slowly learning how to do these. I have a couple more four legged canes that need feet and I will, over time, make more for them. I figure each one will be better than the previous one.
A good clean sandpaper in a fast sander does wonder to clean up mistakes and make new ones. There are those who would simply use the sandpaper to do the rounding that I did with the lathe. It might even be faster. I am trying to learn some techniques that can be used for other projects so it is worth my effort to try these on the lathe.
I do need to spend time and sharpen my tools PROPERLY. I have a long ways to go. Many of the tools were pulled out and then stopped being used, because they were dull.
I will see what I accomplish next weekend.
3656

goblet on lathe

goblet on lathe note thick base

the tools I used. the long one is made to use interchangeable bits.
It used to be a TIRE BUDDY
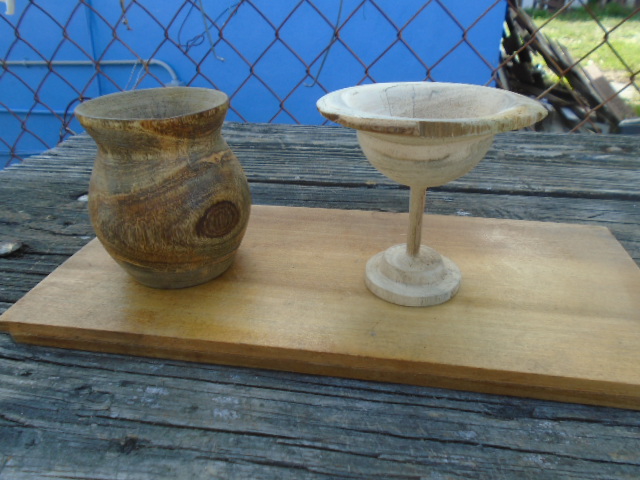
the vase with some varnish and the newly made goblet
note the stepped base. that is a no-no

A piece of wood I decided to turn. see the knot on the bottom of the picture?
that was what I was after
I had already made a tenon when I took this picture.

partially turned not looking good.

partially turned, rotated around.
No comments:
Post a Comment