(January 17, 2000 was my first carving day.)
07-04-13 Thursday HAPPY INDEPENDENCE DAY!!!
92 degrees when I got out back, 95 when I left. Blue sky filled with puffs, with towers to the north. A brisk breeze strong enough to blow stray hair around. An excellent day for stationary working as I was doing, but not spectacular for digging and hauling like what my Mom did.
I will be working tomorrow so I tried to make use of today for some projects.
For over a month, I've been threatening to make a brace of a design of my own. I took out some extra money from the bank and went to HOME DEPOT to get some supplies I would need for this project. It was a weekend to do some real work.
I picked up some flat bar that would be strong enough. I picked up some screws, washers, and a hacksaw.
When I left, I realized I did not get any velcro so I stopped at ACE HARDWARE to get some there. They did not have exactly what I was after but it was good enough to test my concepts. I returned to ACE HARDWARE because the screws I got were too short.
I had decided it would be better to buy what I needed rather than hunt all over creation in Mom's house to find them. It is also fun shopping.
The accident last year broke both bones in my leg just below the knee. I have a plate holding the bones together. Because of the damage, my knee is collapsing, bending in. The cartilage is disappearing on the outside, causing the knee to bend in. In one to five years, I will have to have a knee replacement.
I wear a brace on my knee, which helps, but my knee still bends in and is still getting worse.
The idea for a brace I had, was based on the concept of a rod strapped to the hip and ankle, and then a couple straps to pull the knee back out so the weight would be in the right place on the bones. Then, add a hinge to the rod at the knee so the knee can bend. At least that was the original thought.
A rod would not be the best design because of twisting, so I decided to make it with a flat bar that was stiff enough.
The hinge is a tough part. The commercial hinge I am wearing has the two supports separated by about an inch, which I guess compensates for the knee's movement.
Since this project is first to test a concept, I am using bolts that are too long and the only corners on the metal that I trimmed was at the hinge end of the two bars when they bumped each other when I first put it together.
I first cut the two hinge pieces off the end of the bar. I cheated. I used the hacksaw to cut part way through, then stuck the end in the vice at the cut and worked the metal back and forth to fatigue the metal to break. It broke easily.
With the two sides of the hinge cut, I then did a rough measurement to cut the rest of the bar. The lower leg piece was longer than the upper leg piece.
I then drilled my holes. My drill bits are not as sharp as they should be. I had to drill smaller holes first, then go to a bigger drill bit to do the final hole. Even then it took a long time to drill. I got a bunch of small drill bits at HARBOR FREIGHT a while back and decided to use them. They come in a pack of ten. While drilling, My technique was not great. I think I was pushing too hard. I broke four of those drill bits before the last hole was drilled. I then used a bigger bit to drill big enough for the screws. During all the drilling, I had the two hinge plates, one on top the other so the drill holes would line up. I am glad I did even with the big holes as the big ones were not exactly centered on the small ones. With the pieces on top each other, they were drilled the same.
I thought I was almost done once I had the holes drilled, but when I started putting it together, I found that the screws I had were too short to reach all the way through the assembly. I ended up getting too long bolts to make sure I had no problems. I can always cut them shorter later.
I did find that the corners clashed with each other within the hinge and needed to be clipped. I will eventually use the grinder to round and clean up all ends, but decided to use the saw to cut the corners off. I cut part way through and then worried the metal so it would break. The problem I had was the corners were just not quite long enough for the vice to get a good grip on when I worked the metal back and forth. I got it done but it took almost as long as it would have to saw it off.
I FINALLY was able to test the brace. I used my existing brace to protect the knee and it had loops to hold the velcro straps in place. I then used a velcro strap on my ankle and one around my thigh. The straps were more than long enough for my ankle, but I had to combine two straps to fit around my thigh.
Mom came outside right after I had strapped the brace on. I had her take some pictures of me with it.
The brace does have some problems. It digs into my ankle and into my hip. Both ends could be shorter. The thigh strap did
not do too much. It slipped down. I think my hinge has too much give so it is not holding my leg straight enough.
I will have to get with my brother and see what he suggests and see if he has technology to improve on it. The hinge needs bearings so they will move freely. I may have to attach horizontal plates at the ends to give more surface area for them to press against and to help keep them from slipping or turning.
There are several good things about this project. One, I took a design from thought to practical test all on my own. All parts can be reused for some other project. And finally, it made a good day out of it.
I think this whole project, which has some extra pieces and tools left over, cost me under $40.

Me wearing the new brace. it needs work but showed the concept
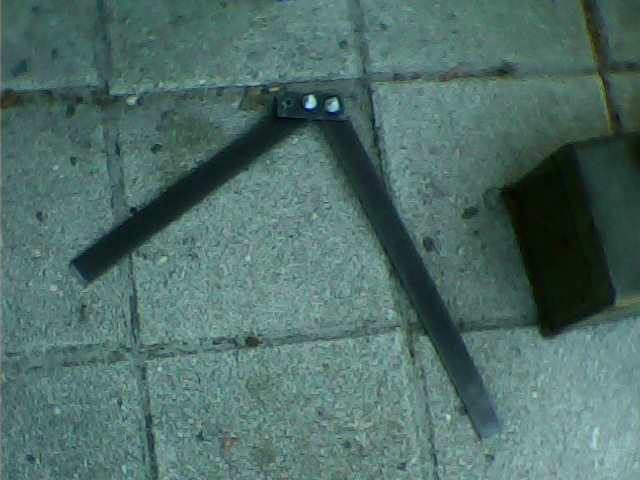
The actual brace. It is strapped into place. Both legs need to be shorter. The hinge needs something different.
A couple weeks ago, I got an electric pasta maker at a hard sale. It came with a drying rack.
While my legs were wore out because I spent most of my time on my feet, I decided to make some fresh pasta using the crank pasta maker I got for my birthday.
I followed my normal recipe, but made the pasta dough drier than I used to. I then used the roller part of the pasta maker to flatten the dough. It takes several passes as the first couple passes, the dough comes out with a torn look. You fold the dough in half and run it through again. I then turned the roller settings to a thinner space and rolled them again. This time, I rolled it down to the thinnest setting, number seven. When the dough got too long, I would cut it and keep working. I ended up with six sheets of dough. I then attached the pasta cutter and ran the dough through the thinnest noodle slot. The last time I did this,. I did not roll the dough out thin enough and it sort of extruded spaghetti. This time it was as thin as the roller would make. It cut them into delicate noodles.
I had set up the pasta dryer which is a frame with removable rods going across the top. I would pick up the noodles with a rod as they came out and set the rod onto the rack. This kept the noodles from sticking together. When I was done, I let them hang for a while as I cleaned up and put things away. I then boiled them up.
Wow, the noodles were excellent. Tiny, just the way I like it. It also did not take all that long this time either. The drying rack worked well also. I will do this more often.
My legs are shot. Not just my bad one either. I have spent a number of hours on my legs today and I know they will tell me all about it tonight. I am satisfied with what I did while standing all that time, so I am not going to complain, much....
I expect to do some wood working Saturday. I have a project to do for a friend. I do have to find a rotary rasp I know I have, but have no idea where it is.
I will see what I actually do Saturday.
 \
\Decided to get a picture of all my cast iron pans. They go from a one egg pan up to a family pot. I have a large pan, a medium pan and the one egg pan out to be used. The rest nest together on top the kettle. The oval pans in back, I learned last night, are the same kinds of pans used by Denny's for their skillet meals.

Also got a picture of my stainless steel bowl collection. They nest together so they don't take much room in the cupboard.
No comments:
Post a Comment