Sunday, January 3, 2021

Year 20, Week 46, Day one (week 1089) 12-05-20 Saturday

  Year 20, Week 46, Day one (week 1089)

(January 17, 2000 was my first carving day.)

12-05-20 Saturday


High around 82, no humidity, light breeze, well spaced clouds crossing the sky. This weather report is brought to you by The City Of Pompano Beach Department Of Tourism.


I had the idea to try to make some foil roses. I’ve collected aluminum seals from coffee cans. They are still flexible but heavier than foil. I had an idea of how to do it but the various versions I tried failed miserably. Later I went on line and saw four different methods and none the way I was doing it. I had already given up for the day.


Last week I did repairs on the box the holds my mini metal lathe. The plywood in many places were seriously decayed. I still had one spot to fix and that was on the lathe. The wood had decayed and left a jagged gap. What I did was to check to see if the thin plywood I had would work there. I then marked the hole square, and used the dremmel with a cutting disk to cut the space quite straight. I then cut a piece of my plywood to size and glued it in place. A bit later, I drove in a dozen or so brads to help hold it. And after the glue dried, I used a waterproof glue to go over the seams and fill any gaps. It is not pretty, but it did the job. 


That made it a day and I took it easy after that. 


Year 20, Week 46, Day two (week 1089)

(January 17, 2000 was my first carving day.)

12-06-20 Sunday


84 as the high, but the temps went down to 79 as it clouded up. We are expected to get down below 50 Tuesday. Since 56 degrees is our frost temperature down here in Florida, I expect to be slipping and sliding on the way to work.... This weather report is brought to you by The City Of Pompano Beach Department Of Tourism.


I had an idea of how I would do my aluminum flowers, but after doing a little bit, I decided to hold off. I needed scissors and was too lazy to go get them to do this work. I will do it next weekend. 


I dug out the mini lathe and found that the lid, at the hinge was coming apart. I did not do well in driving my brads. I missed the thin plywood several times. What went in did not hold well. I will fix it better next week. 


I tried to make a part for the tailstock but the lathe was fighting me. I ended up giving up on that for now. The chuck I am using uses a rod that goes on to the hole to leverage the jaws open or closed. I had a rod that was slightly too big so I tried machining it. While it looked straight, there was a slight bend in it and that made it tough. I finally stopped and left it for a later project.


My brother, several years ago, scroll sawed some ornaments. We found them and decided to clean them up and finish them. Clean up happened several weeks ago. I was supposed to paint them white, but I could not find our white paint and did not want to go to the store today. I found some “metal” paint, that turned out to be silver, and painted them with that. They look pretty good. 


I dug out all my ornaments and photographed them. The old ornaments, remaining from over the years, and the newest ones too. While I have a lot of ornaments, I don’t have as much as I thought I did. 


My brother came and we worked on the metal lathe a little bit. He had replaced the motor and it had a new pulley. Now he brought in a new pulley and we had to ream out the hole to fit the shaft. It took some filing and grinding, but we finally got it on the lathe. There is an idler pulley that allows you to slow the lathe down, or speed it up, depending on how you arrange it. The new pulley my brother had made would not allow it to match up We now have that solved. 


We repaired a leg on mom’s table and it is not right. We will have to dig into it sometime during the week and get it right. 


I have a copy of nearly every ornament I have ever made and I put them on my personal tree. I searched the house trying to find it. I remembered that I took the box, that was in a bag to help keep the ornaments in place, out of the closet I put them in. I had no clue where they went from there. I searched all the possible places they could go, digging deep in closets, in piles, under things in places I knew they would not be. I then found them in a popcorn can in the closet where I always kept them. Dang. That was one place I did not look.... I have some house cleaning before the tree goes up. 


During the week, I was going to do some sketches of possible Christmas card designs to do, but got side tracked and that never happened. I need to get to designing. Christmas will spring onto me with no time to do anything. I tend to do 40 or 50 hand painted cards and I really need to get started as soon as I can. 


Will see what happens next week.

954

My christmas trees with 20 years of accumulated ornaments.

left side


front

right side

large crochet ornaments (by a friend)

small crochet and fabric ornaments


Friday, January 1, 2021

Year 20, Week 45, Day one (week 1087) 11-26-20 Thursday ThanksGiving Weekend

  Year 20, Week 45, Day one (week 1087)

(January 17, 2000 was my first carving day.)

11-26-20 Thursday ThanksGiving Weekend


Last week I finished my ornaments for the year. I have two kinds of boats, Orca and Dolphin, pianos, two kinds of guitars, two kinds of drum sets, and Banjos. I tried many more designs and they were either not satisfying or were going to be a serious amount of work I did not want to do. 

Now I have to work out what artwork will be in my Christmas cards. I have plenty of snowmen, lighted trees inside and out, fire places and windows. I have to find a design that is easy to do in great numbers, but something different than what I have done so far. 


Because it was Thanksgiving, I was involved in indoor projects in the morning. We had decided that our three families will have our Thanksgiving dinner individually. Mom cooked the turkey, stuffing and mashed potatoes and had someone deliver the food to the other two families. 

I took a nice nap and spent the last of the day talking to mom.


Year 20, Week 45, Day one (week 1088)

(January 17, 2000 was my first carving day.)

11-27-20 Friday


Blue skies, with clouds, low 80s with almost no humidity. There was some showers to the south and to the north but none here. This weather report is brought to you by The City Of Pompano Beach Department of Tourism. 


I ran to some stores, helped rearrange the living room, worked on some quick projects. 


After I took a quick nap, then went out back to work. I took out the metal lathe and started machining some drill bits so they could fit in the dremel. I only worked a couple hours and had four drill bits modified so they would work.  The main reason I stopped working was the motor overheated. The safety refused to let the motor run any more until it cooled down completely. 


Year 20, Week 45, Day one (week 1088)

(January 17, 2000 was my first carving day.)

11-28-20 Saturday


Blue skies, with clouds, low 80s with almost no humidity. There was some showers to the far south but they were leaving. This weather report is brought to you by The City Of Pompano Beach Department of Tourism. 


I got a late start, going to a few stores, then went out back. Most of the year, I was bringing a basket full of project and supplies out back with me. Today I left it inside. I dug out the lathe and the dremel box. I emptied the dremel box completely, dumped out some accumulated sawdust, then got my drill bits together. I ended up with two batches of drill bits. 

One by one, from the largest to the smallest, I was machining the shafts of the drill bits to fit the dremel. I removed the chuck from the dremmel and made sure that the bits not only fit in the jaw, but could pass through the slightly narrower shaft. 

Yesterday, I found one drill bit would not cut. The very end was soft enough to cut but closer to the flutes of the drill, it was hardened. I tried it a couple times. It was not until I changed bits, and after getting some cutting oil, that I got some results. 

I was using bits with interchangeable triangle bits. I broke a couple triangle tips in the process. I got a lot of where the rod bent slightly and rode up onto the bit. I got a bunch of times where a piece of the metal would cut thick and curl and catch on the cutting bit and stopping the lathe. Most of the time the motor still spun but the belts would be slipping. 

At this time of the year (with the loss of daylight savings time), the sun starts showing under the awning after three. That was when I started packing up. I figured that when the sun went low enough, it would be too dark under the awning to work. I was happy that I made all the drill bits fit the dremel. Once I got down to a certain size (working from the biggest down), nothing would need to be done as the bits would already fit the chuck. I think I counted 14 bits I converted. 

I had emptied my dremel box and found more drill bits. Had I known I had them, I would not have purchased the bits I did a few weeks back. 

It is surprising how when you empty a box, when you put stuff back in, there is never as much room as you started with...


Year 20, Week 45, Day one (week 1088)

(January 17, 2000 was my first carving day.)

11-28-20 Saturday


81 degrees, very low humidity. It showered slightly last night but was dry all day long. It was mostly sunny with some clouds moving across the sky. This weather report is brought to you by The City Of Pompano Beach Department Of Tourism.

I had a special project to work on today. After I did a run to gas up, and then look for some things mom wanted that turned out not to be available, I went out back to work.

I had to set up two folding tables. One folding table had my carving basket, the dremel box and the contents of the lathe box, including the lathe. Even then there wasn’t quite enough room and I was up and down on my feet quite a bit. 

The bottom of the lathe box was breaking away. I knew that there were problems with a couple of the sides of the lathe box also. 

With the lathe box empty, I took a small hatchet and hammer and went over the different sides of the box. Bugs attached one wall. I found that they ate the layer of the plywood just under the surface. I scraped the bug damaged material off. The bottom was in really bad condition. I removed the plywood from three quarters of the bottom. The last quarter was strong yet. 

After I finished cleaning, I took some remaining thin plywood I had purchased for other projects. I measured by laying the plywood on the box. I had to straighten the edge of the remaining plywood and then cut the new plywood to fit. It was thinner than the original plywood but I went with it. One section crossed the whole box but there was a small section left. I had another board and could have cut it to fit, but instead, I took a smaller section of plywood and cut it in half and had the two halves sitting on two wall, touching the larger piece meeting in the center. Yes, the joint might not be as strong as it should be, but I figure it would work. I used A-B epoxy to hold the plywood in place. The box had a fiberboard over the bottom wood I had pried that off and I spread glue all over the surface of the plywood and laid that back on. I then drove in brads at about 3" spacing all the way around the box bottom. I was surprised when I looked inside the box that none of the nails were showing. Between the epoxy, the glue and the brads, I figure the bottom of the box will be strong enough for how it is used. 

There were several U shaped fittings on the inside to hold things in place. Except for the center divider, they went easily in their original locations. Nails stuck out in a couple spots to take them in place. While I cleaned their bottoms, I put them in, upside down to improve the glue bond. 

The center divider was a bit of a problem. The original wood it was attached to did not survive the years. What I did was to glue and brad nailed some pieces of wood to it, then glued it to the bottom. I really needed to screw or nail them to the floor, but could not find a screw the right length. I ended up leaving it with just the glue. At the end of the day, I had to put everything back in the box and I moved the center divider a few times putting it back in place. How well it holds will have to be seen next weekend. I may have to run screws in the blocks and then grind off the ends on the bottom. Will have to see. 

I reached for the drill bits to show my brother and dropped it. Bits everywhere. I picked up most of them, used a magnetic tipped rod to try to find more. After everything was put away, I ran a wheeled magnet over the ground and found a few more, really small ones mostly. 

I am still surprised at the results I had this weekend. Getting all the drill bits machined to fit the dremel was really something. Then fixing the box so it is useable again was also great. My brother took a large drill bit set with him. He will de-rust them, and then sharpen all of them.  I need to have a different way to hold drill bits both for the dremel and for this big set. The hard part is to have the drill bits under control but not taking very much space. 

Next week, I am thinking that I will run the sander on the outside of the lathe box to make it look cleaner.  I do have a hole to fill on the lid. It was suggested that I should sand and varnish the box so it looks nice and hold up a bit longer. That might be my project next week if the weather is good enough.


Some coffee cans have a soft aluminum seal. You peal it off to access the coffee. I’ve collected them for several years. One project I would like to try it to work that soft aluminum into some roses. I know the concept in theory, but execution will be something else. It would be a good present for someone I know.

Tomorrow, though, I will bring my Christmas ornaments to work to show them off. Some people have purchased them. I always have ornaments from previous years to choose from. Each year, some of the new ornaments are gifted to members of the family and to some close friends. 

We are talking about putting up my tree. I have ornaments from every year I have done ornaments and they are in a box. I now have to try to find out what I did with that box. Things have moved around a lot this year and it will be an interesting treasure hunt. 

I will see what I actually do next weekend.

1824

some of the machined drill bits to fit into my dremel


The following is a picture  of all the ornaments I have left, many are from various years that were not sold or gifted.

Bird ornaments, pole cats, reindeer.

the fishes 

ships

stringed instruments

hearts, pianos, paint brushes, books

drum ests

snow men, angels tin soldiers, light houses and rocking horses

boots, balloons, bells (from very first year I made ornaments) light bulbs 

trains tea pots, buckets, stool, gloves, boot, mouse and polar bear


Year 20, Week 43, Day one (week 1086) 11-14-20 Saturday

  Year 20, Week 43, Day one (week 1086)

(January 17, 2000 was my first carving day.)

11-14-20 Saturday


Some early morning sprinkles, nice the rest of the day. This weather report was brought to you by The City Of Pompano Beach Department Of Tourism.


Last week I finished my drums, guitars and banjos. I let someone take a guitar and gift it to someone else. There is satisfaction in finishing something. 

Today, I decided to do the guitars and drums, but use a different design. For the guitars, I decided to make electric guitars. For the drums, I decided to make a base drum with small drum and symbol. 

I was going to use the mystery wood I got from work, but decided that would be too heavy. Instead I dug out an old 3x3 and turned that round. I cut the drums a little thinner than they should have but they will do. I had some small drums from a previous experiment and decided to make use of them. I drilled and added dowels for them to be mounted on the base drum.  My symbols were made from the mystery wood because I knew it would be strong. I made them too small but went with them anyway. 


For the symbols, I drilled and glued a heavy bamboo rod in place and then after some hand sanding with the dremel, I mounted the shaft into the drill and spun it against the spinning dremel bit to get a shape close to what I was after. I likely could have done that from the start and done a better job... While I tried to get the shafts center, the drill wandered a little. I should remake them, bigger, but won’t. They tell the story. I cleaned up the big drums and made sure they were sanded nicely. 


For the guitars, I looked on line to find out what they looked like. It is surprising how one can recognize something without knowing how it is shaped. This time, after deciding on the basic shape, I sketched it on paper so I would have something to go by (no printer). 

I drew the guitar shape on a two by two, and used the bandsaw to cut it out. I used the sander to clean up the shape, then put it on its side and ran it through the bandsaw to make four guitars. I sanded them on the disk sander so the surfaces were flat. I traced one and cut out four more. 

I used the drum sanding bit on the dremel and sanded beside the string path. The string path will be raised up and I will draw some strings on it when it gets to finishing. 

I considered that a good day of work. I spent most of the day and got results.


Year 20, Week 43, Day two (week 1086)

(January 17, 2000 was my first carving day.)

11-15-20 Sunday


Some dots of rain on radar, but none that would ever come close to us. The day was nice and the 84 high was comfortable as it was a dry air.. This weather report was brought to you by The City Of Pompano Beach Department Of Tourism.


I did touch up on the drums, using the sanding drum in the Dremel, I sanded the fabric area so the rim was raised up slightly. I was not accurate on the size, leaving the rim too wide but decided it was easier than correcting a mistake by going too close to the edge. I also touched up the small drums that way too. 

I drilled the base drums for the small drum and symbol. A few times I got off track and broke through the side. One I split in half and had to glue it back together. 

I then dug out the paint and started painting everything. The symbols are in canary yellow so I could not do a drum in that color as that is my version of brass. I keep forgetting that I need to paint things white before adding that color as the wood beneath shows up. 

I messed up on a couple colors but finally got them all painted. I did not do the white on the rim of the drums and will have to touch up the tan of the drum surface. There will be several rounds of corrections on the colors as brushes slip sometimes. The guitar gets some more colors too. 


Several weeks back, the motor for my little machine lathe was dying. My brother took the motor and the mounting with him and machined up a new motor mount. He had picked up a sewing machine motor but it was not powerful enough so he ended up getting a fan motor used in a cooler unit (cannot remember if it was an AC or a walk-in cooler.  He set the lathe up with the new motor and it has more power than the older motor had. We can cut a little deeper than before. Now my brother found that the chuck was not good. 

One project was that I purchased some cheep drill-bit set and figured I would machine them so they will fit in the dremel. I could use the dremel for drilling holes larger than it is is supposed to handle. My brother machined the end of the largest drill bit and I stuck it in the lathe and accidentally put it on full speed. It spun nicely for a minute then broke, sending the bit flying. The little part of the drill bit that my brother machined to size, was still in the dremel. I really need to swap dremels. I have one with a grinding bit in, sort of permanently attached. That one has better speed control. The bit can be used with poorer dremels that generally do best at high speed. 

I have the original wood box the lathe came in, but it has taken a serious beating. I really need to fix it, possibly replacing some parts. I emptied it out and re-packed it and that helped give us some room but the box really needs work. It is outside and time has done a number on the wood. 


Next week I hope to finish the drum set painting and glue the small drum and symbol in place (have to finish painting first). If I can get the painting done next week, then all I have to do is add the eye hooks, sign them and varnish them. Since I try to have everything done by December first, this will be a challenge. The weather and my skills will tell if I get them finished. Next week I also need to start on some more banjos. I only have four, but that is enough to show initially. I do want a dozen of them when I am done. ‘

Will see what happens next week.

1146

the carved duck is now finished

front view of carved dragon egg

left side view of carved dragon egg

back view of carved dragon egg

right side view of carved dragon egg.

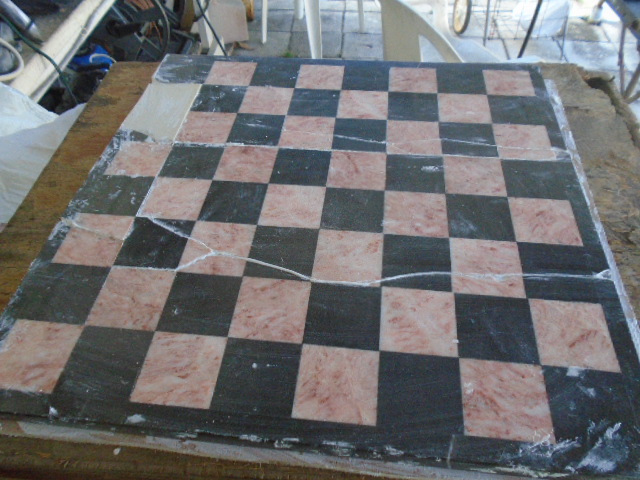
Broke marble chess set I am repairing. the white is some thick plastic I had.Some more sanding and I will then have to paint corrections to match the rest.

first drum set finished

first guitar set finished

second drum set finished

second guitar set finished

banjos finished