
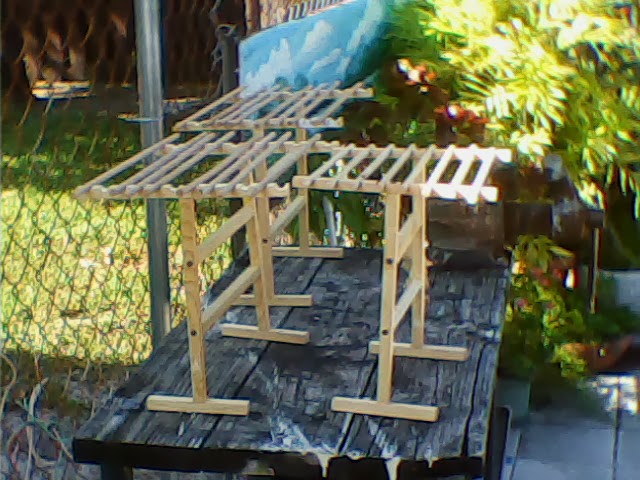
Pasta drying racks. The one on the right is smaller except in height and used dental molding to hold the rods.


The finished stick of glued dental molding after the rough base was removed.


Some figurines I picked p at a yard sale. The guy also had unicorns but held off on them.

Cast iorn fry pan with wooden handle. It had some surface rust. I cleaned it up and this is after I gave it a light seasoning and used it once. I will use it for a while to give it a real good seasoning.
Year 14, Week 35, Day 0ne (week 681)
(January 17, 2000 was my first carving day.)
09-21-13 Saturday
86 degrees at nine, 89 at two, blue sky to the east over the ocean, puffs to the west over the Everglades. A good breeze kept things nice. This Weather report is brought to you by the City Of Pompano Beach Department Of Tourism.
The mocking birds have started singing again. You cannot get a better singing bird than them. I can listen to them all the time. The variety of their songs, and between birds make them the ultimate singing birds.
We hit three yard sales and I somehow left all of them without buying anything. I had seen something I wanted to get as a present, but it turned out to be part of a set and I did not need the rest of it.
I had a number of projects in mind. The big one was to make some pasta drying racks. I had done most of the preparation for the project last week. Today was the cutting and assembly.
For the screws that went through the sides of the sticks, I used a larger drill bit than the screws I was using. This would allow the parts to rotate. Some did not need to rotate, but I did the same thing for them anyway.
I also used a tiny drill bit to drill into the ends of each stick that got a screw into them. This aided the screw entering them, prevented splitting of the wood and helped me get the screws to go in straight.
On the side pieces, I also used a very big bit and countersunk the holes by hand so the screws would not stick out. This was especially important for the feet so they could sit on the counter flat.
The hardest part was to decide how big the racks would be. My main decision was to cut the three foot long sticks in thirds and that gave me the height and the width of my first two racks.
I found that I need screwdrivers with larger handles as the ones I was using was really wearing out my skin as I could not get really good force on the screw. I would have used a drill or battery powered screwdriver but I could not remember where my bits were and was too lazy to look for them.
My first two racks used the rod holders I made last week, where I clamped two sticks together and drilled between them on the edge.
Later in the day I went to HOME DEPOT and picked up some more rods and sticks. I made a third rack and I used the Dental Molding I had purchased a couple weeks ago. When I made the other ones, I realized that I really should have cut some of the sticks in quarter rather than thirds. This third rack was made at the same 1 foot high as the others, but all the rest of the sticks were at 9 inches, a quarter of the three foot stick. Part of the reason I did this was that the piece of dental molding I was using was not as big as the rod racks of the other two. I went with the foot tall because noodles can easily be that long.
I still have sticks and partial dental molding that I can make use of.
Between the racks, I carved another penguin. I was getting close to finishing when I lopped off the arm. One problem of carving in WHITEWOOD is that it splits easily and delicate parts disappear faster than you would believe. I glued the arm back on and set it to the side. Later, after the glue dried, I carved more on it and decided to let it set for when I do the finishing carving on all the penguins.
I decided to experiment with a possible second carving design. It was suggested to me a few times and fits for down here in Florida. I took a four inch long stick and cut some of the corner off on one end, then the opposite corner on that end. I then turned the piece a quarter and removed those corners so the piece was twisting.
I then kept shaving and shaving until I had a nice fairly flat twist. I also started shaping the head end of the stick based on memory of what a MARLIN (A sail fish) looks like. I started splitting off a fin so I glued that back on and let it dry. Later I did more carving on it. I have more clean up but it came out pretty good so far. Everybody will know what it actually is once I paint it.
I finished working at about three. Both of my wrists bothered me as they both got a real work out between carving and driving in screws. I was seated all day long so my leg gave me just the normal bother when I first got up.
Tomorrow, I hope to work on more pasta drying racks and carve some more figurines.
Year 14, Week 35, Day Two (week 681)
(January 17, 2000 was my first carving day.)
09-22-13 Sunday
90 degrees with good breeze, interlocking feathers to the east over the ocean, building puffs to the west over the Everglades. The puffs started building bigger and bigger as the day wore on. This Weather report is brought to you by the City Of Pompano Beach Department Of Tourism.
I got kidnaped by two yard sales, one going to Mom's house and the Other on the way home. going to Mom's house I got some figurines, some are refrigerator magnets. Most are some form of dragons.
The one on the way home netted me a cast iron fry pan with a wooden handle. It had some surface rust as it did not have any seasoning. I gave it a very light seasoning and then used it to cook dinner. I will use it for a while until it is properly seasoned. I will likely gift it to someone who will really enjoy it. I do like the wooden handle, though. Nice to handle it. The eye hook on the end is what keeps the wooden handle in place. I found out that the eye hook is basically a threaded rod that goes into the pan where it meets the wooden handle.
When removing the dental molding from the cornice piece I had purchased a couple weeks ago, some of the glue was stronger than the wood and the wood split on an angle when I was trying to separate them. Some of it was unusable as it was not strong enough to take light abuse the pasta racks might take. I applied glue to tops of the dental of the dental molding and applied it to a stick I got yesterday. I put another one on the other side to allow me to apply even clamping pressure. I used a number of clamps to make sure I had good pressure everywhere. I set that to dry.
I later un-clamped it, used the bandsaw to remove the worst of the old wood, and then used the disk sander to bring it down to where the wood between the crowns came off. It looks good. They should stay on nicely. I consider that one of my best glue jobs. I did a lot of measurements and decided to wait till next week to make more Pasta Drying
Racks.
I was planning on turning some wood. I even cut a piece off a branch my brother gave me from his Live Oak Tree. I looked at the wooden wheel I made and decided to put that onto the wagon I made it for. I was not going to put the rubber tire on. That, I think, requires boiling water and gloves to get it to stretch enough to fit.
I broke off the rest of the wheel. the part around the axle was good and strong. I ended up using a dremmel to cut the plastic off the shaft and then it took a lot of prying to get it off.
My next project was to get the end cap of the axle off. It took some pounding. After trying different methods, I took and set an ax blade against in and hammered on the flat end of the ax. That finally drove the cap off so I could put the new wooden wheel on. I did some guesses of how wide the wheel needed to be to fit. I sanded off a bit more than I needed so there is more play than needed. I also guessed on the right size drill should be used for the shaft, going a bit bigger. Smaller would have been better. I got the wheel on and figured it will work for a while.
I was pushing the wagon into the hole it came out of next to the band saw and the opposite wheel broke!!!! I see now I need to replace all four wheels. That will give me a good lathe project in the next couple weeks.
About the time I had done those projects, I had enough for the day. I cleaned up, which putting everything away is a project itself.
The Marlin needs some clean up to be presentable. It will also need paint. I still have not decided whether to do them as a series. If I can bandsaw the corners off it will make my project easier, but I need a safer way of handling 45 degree angles that the two by twos have to be. I might try setting the bandsaw table to 45 degrees. Then the stick will think it is laying flat on the table.
I have a number of projects to work on next weekend, some have been sitting for months.
I will see what I work on next weekend.
No comments:
Post a Comment