Year 21, Week 03, Day one (week 1097)
(January 17, 2000 was my first carving day.)
01-30-21 Saturday
Temps starting with a 59 low and rising to 77 high. Partly and mostly cloudy, but there was some sun, especially around noon. This weather report is brought to you by The City Of Pompano Beach Department Of Tourism.
I went to a memorial for an acquaintance of mine, but a good friend of my mother. The friend passed late last year from cancer. We saw some people I have met many times. It is surprising how people are easily recognizable even with a mask on. Gives a lie to bank robbers not being known because of a mask....
Because of the memorial, and having to do some computer work, I accomplished nothing in woodworking today.
Last week I mentioned that every tool does damage to your work. Sometimes the damage is what you want. Other times it is not. A year or two ago, I told about sandpaper. I thought I would explain about it a bit differently this time.
When you are making something, nicks, dings, scrapes, ripples from tools cover your surface. You need to remove them to give you the surface you are after. That is where Sandpaper comes in. Scrapers can be used on flat projects, but ones with curves are difficult for a piece of metal to match the curve, so sandpaper is needed.
When they make sandpaper, the sieve it through different meshes. Each mesh is classified by the number of lines per inch. 30 grit sand paper is 30 lines of mesh to the inch. 240 grit sand paper is 240 lines of mesh to the inch. Grit that cannot go through one mesh is given the grit rating of that grit. Anything that goes through is given the rating of the next mesh grit.
Different manufacturers use different thickness of mesh lines, and also the mesh count of their meshes come at different spacing. One might have 80, 100, 120, 200, while another might have 60, 80, 150, 250. There are different glue compounds to the sandpaper. Sandpaper for sanding metal have a weak glue because the edges of the stones wear out quickly so they are knocked off and the next layer starts their cutting, or they are super hard and glued in place, though some metals are even harder than that. Sandpaper for wood and plastics have a stronger glue, though each manufacturer has their own glue recipe. Sandpaper for power tools have glue where it encases the grit so that it will last a long time. It would be miserable to have to change a sanding belt after ten minutes of use because the grit wore off.
Now back to the surface damage. The way sandpaper works, is you use the coarsest sandpaper that the damage will require. If there are deep marks, you might need 40 grit, but most people start at 80 or even 100.
The grit of the sandpaper scores the surface. The object is to get the surface covered with the scores of the sandpaper and nothing else, which means scraping down to the lowest damage that has to be removed. When the surface is evenly scored, with no high or low points, then you go to the next grit of sandpaper. The key is to make sure the entire surface is fully sanded with that grit so all you see is the scores the sandpaper makes. Get rid of those divots and scores. They will look worse and worse as you go to higher grit sandpaper and are harder to remove then.
As I was saying, with the next sandpaper, you grind the surface until all the marks from the previous sandpaper is gone. Because the scores are smaller, it won’t look as bad. Then you do the next grit of sandpaper, and you keep doing it until the surface is smooth enough for whatever finish you want to do.
I hear some cabinet workers go to 150, furniture makers might go to 350. Many wood turners won’t stop until they are at 400 or 600 (usually varnish won’t stick to surfaces sanded to higher grits). With some really hard woods, you might sand up to 12000 grit or higher and have a varnish-like polish to the surface from the wood itself. You sand to whatever level you decide is enough. The key is to remove all scores from the previous sand paper so everything is even. Many times I’ve had to destroy a fine surface to remove mistakes missed by previous grits due to my laziness.
Power sanding will fix really bad mistakes, or large areas of flat. One of my problems I’ve seen with using power is that I don’t always hold the sanding surface even to the surface of my work, especially on a curved surface so I end up with divots or scrapes and such that have to be removed with even more sanding. It is great when fixing really bad mistakes or tool marks but there are limits. Many times I didn’t realize I had flaws (from lazy sanding) until I give the work a coat of varnish. The varnish hardens the wood and the varnish coat has to fully cure before correcting the errors in order not to have to toss a bunch of sheets of sandpaper because the varnish gummed them up.
Sanding takes patience and time, and that tends to be something I don’t have a lot of.
I will see what I do tomorrow.
Year 21, Week 03, Day Two (week 1097)
(January 17, 2000 was my first carving day.)
01-31-21 Sunday
Temps starting with a 69 low and rising to 77 high. Lots of feather clouds and pulled cotton in the sky, but the whole day was sunny, so they were not stopping the sun. We are expecting mid to high 40s for part of this week. Slip and slide time on the highways. I may have to dodge the glacier that comes from our highest natural point. I will not be able to try to drive over the great ice sheet to the Bahamas this week. I have some projects most of the week. This weather report is brought to you by The City Of Pompano Beach Department Of Tourism.
I sat and sanded my little tea pot for at least an hour, then gave it several shots of varnish. Of course, when you do that, all sorts of errors show up. I have some spots where the glue was on the surface. There are some places that needed more sanding. I kept giving it coats of varnish and will leave it at that, at least until the varnish cures enough, likely next weekend.
To fix mess up and then fix the tea pot, I dug into a bin I have that has mahogany and other kinds of wood. I took some pieces out with the idea of making use of them. I started measuring a piece of mahogany to make a little saucer out of it. Using a triangle square, I ran lines off the corners to find the cent. At the edges of the wood, the lines were not in line. I used the square to check the edges. I had placed the triangle on the long sides of the block and ran to the corner. Well, I found out that the two sides were not parallel. I then used plan two. I measured the width of the wood and measured that dimension up both sides of the block and drew a line between the two points. That line made it square.
Then I got an idea of something more important.
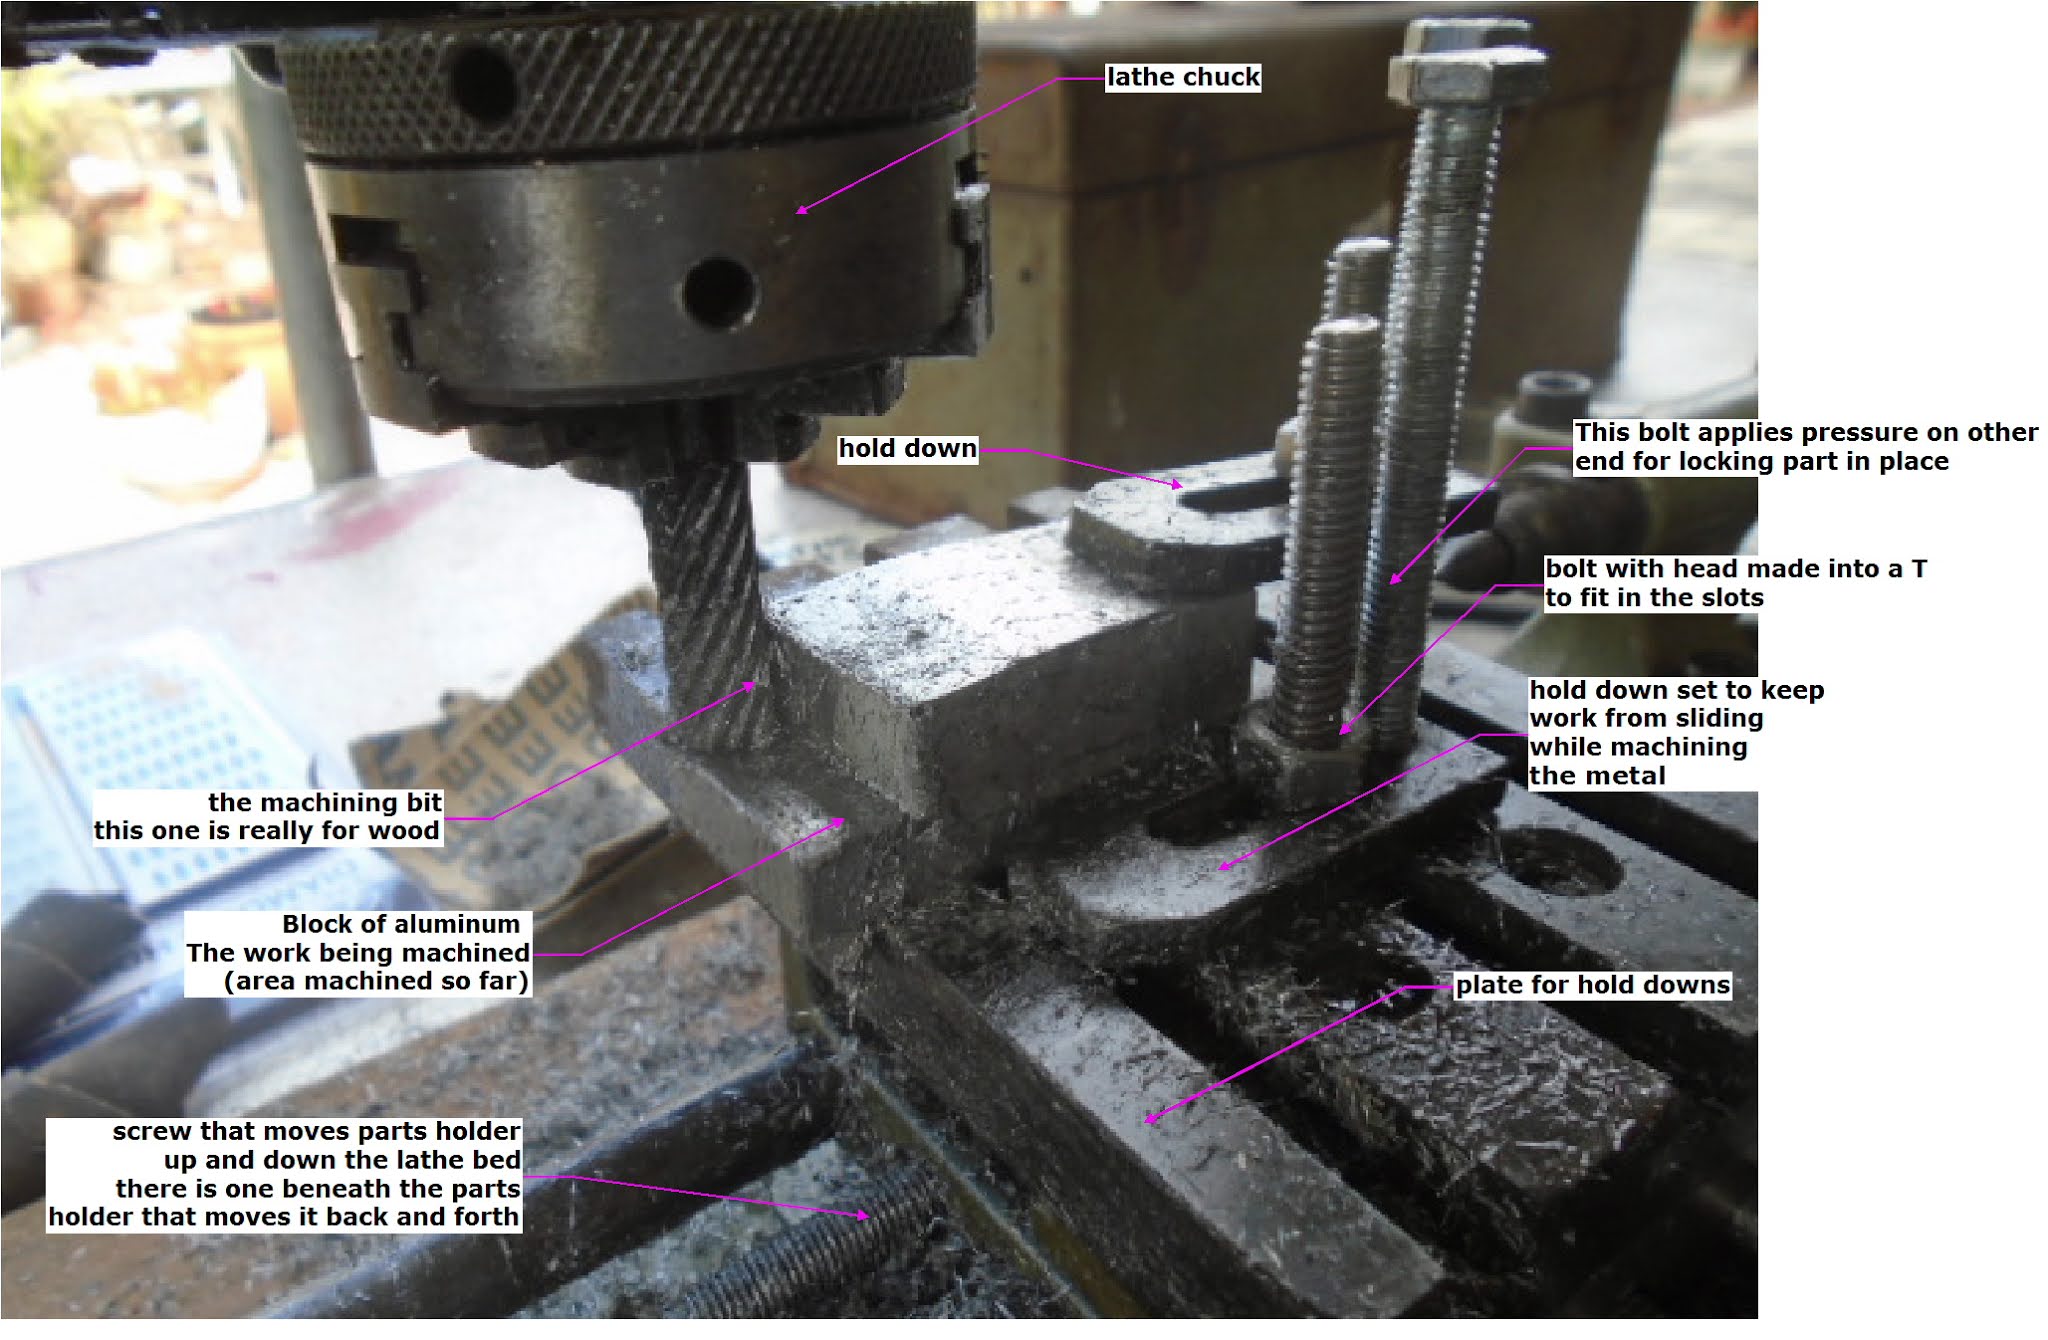
Last week I broke a lathe dog. I decided I would try to make a new one. At first I was going to make it out of wood for practice of the steps to create the design, then I decided to look in my chowder box, which is what the machinists call the box that holds bits and pieces of materials for projects. I have some steel the right size, but did not feel ready to try machining steel. I decided to use a piece of aluminum instead. The part that goes into the hole of the face plate won’t be as long as the original, but I decided it would still work when done.
I didn’t have a hack saw at hand, so I could not simply cut the excess material off to get the rough shape, which is the easiest and fastest. Instead, I decided to try machining the material off. If nothing else, I would gain experience. Of course, I did learn a lot. The piece of aluminum was cut off of some casting I was given by my brother. He had melted some aluminum and stuck them in a container so I ended up with a block. This was later cut off of it. I don’t remember why. The top was not flat. And that complicated holding the piece in place without it moving. Any movement can ruin the work when you get to the final dimensions.
I was working with a number of problems as I was starting out, because the piece kept moving. What I ended up doing, was to use a hold down on top locking it against the work plate, while setting it to match the angle it could hang onto. I then set the other hold down right along side the bottom of the block, synched down, to keep the block from sliding as the cutting bit dug into it from the other side. That worked.
Most wood working tools will work on aluminum. I could have used the bandsaw to remove the excess material, but that is hard on the band saw blade. I would rather not have to change that blade any time soon. The bandsaw needs mountains of work and I am not quite up to getting it to where it needs to be. I would replace it with a high quality, accurate bandsaw, but this one works well enough. Nothing I am doing right now needs to be THAT accurate.
I started with one bit and it was fighting me a little. I took that off and grabbed a drum style bit with loads of spiral teeth running down it. My brother later told me that this was a woodworking bit. It worked fairly well, though my chuck would let it slip once in a while as the spiral would pull it down. I only machined about half an inch, but I got some good experience on machining. The big key to machining is learning how to hold a piece, how much a particular bit will cut, and how to clean up. While most of the metal stayed on the lathe, I had little bits on my shirt and my pants. They don’t brush off easily. Hopefully the wash will deal with them....
Next time I work with the lathe in the milling configuration like I did today, I will be able to set up faster and be able to work sooner. Like I said, I had decided I was going to get some experience in milling and machining. From what I understand, steel will require a lot shallower and slower cuts than what I am doing. Of course, I would do better cutting less metal each time anyway, though it would take longer.
My brother suggested that I test every cutting bit I have and see how they handle the metal and how they work. Some may work better than others. I should also check to see if I change the configuration of the pulleys, speeding the spin rate up or slowing it down, whether it would improve the cutting of the bits. This experimenting would teach me a lot of what I am doing.
Later in the afternoon, long after I cleaned up, I dug out a brand new Harbor Freight diamond stone set (the three plates has the grits of, 180, 250 and 360 grits) Along with a bunch of my chef’s knives and a leather strop mounted on a wooden handle, and sharpened them. I also sharpened Mom’s favorite chef’s knife. They are sharper. At home last week, I needed to cut up some meat and realized I was not happy how sharp most of the knives were. I took what I felt was among the sharpest of them this time and used it to julienne some pork skin from a cooked pork roast I bought. I cut some earlier in the week and struggled. This time the knife handled it nicely. I need to sharpen the others a little more. In carving and in the kitchen, sharp knives cut the subject, dull knives cut fingers. The comparison between the two cutting sessions proved the point to me.
I have worked on the crochet hearts this week. I found I have to stitch two together for them to be really useable or even good looking. That means that I have five hearts made, rather than a dozen (a couple came apart). It takes longer but looks better. Like everything else I do, I am a bit sloppy at this. Mainly I need to just take my time and concentrate on doing everything right, rather than trying to get them done. Typical for me. I am the kind of person that the closer the start and the finish is on a project, the better I like it.
Next week I have a lot of projects to work on. The crochet might be done during the week. I do have the puppy bouquet to do and I would like that done by Valentine’s day. If I have enough material, I might make two. I don’t have the bucket but something else might work. I will have to see. I likely won’t do more machining unless I find a blank spot in my projects. I also doubt if I will make that mahogany platter I was laying out for and leave that wood for something else. I have loads of projects that won’t be a one weekend thing, and therefore likely won’t be done. Other projects, like making center rests for my two lathes look like distant future projects.
I will have to see what I do next weekend.
2403


No comments:
Post a Comment