(January 17, 2000 was my first carving day.)
07-02-16 Saturday
77 degrees at dawn , 88 at ten and 95 at three. We have a sort of a front over us sending Morse Code radar blips, dot, dot, dash, dash, dot, dash, dot. Humidity was so high, I considered that swim fins would make moving around a bit easier. This is because of the hot sun shining down with a vengeance right after the short showers. Sunshine came down most of the day in spite the roving towers and puffs. After about ten, our little area remained dry with the towers going on both sides of us. They disappeared by about noon and a wall formed over the Everglades and remained there.
After breakfast, Mom wanted to visit the lady that has had the craft and art stuff for sale because she is moving out of state. We got there and picked up a few things. While we were there, a cloud had a slight embarrassment and we had to help the lady get things covered. She had someone to pick up furniture and could not put the tables back inside until that stuff was gone and they had not arrived before we left. She did not have a lot out at the time, so I was kept under control on my gathering. Mainly I got some more ink for pads or possibly an air-gun spray-painter mom has. I also got some artists crayons (much more pigment than normal crayons) and oil pastels (pastel powder bound with oil, almost like a crayon, but a crayon is bound by wax). On the radar, this cell was a faint green smear that appeared and disappeared.
The very first thing I saw was a doll. She was very pretty and had a wonderful dress. I have a few dolls, but only get them if they are especially pretty. Most I see are not. This doll threw herself into my hands and hugged my arm. I had to take her home with me. She is now in a special place on top of one of my shelving cabinets. I think that because of her long hair she is supposed to be Rapunzel.
We headed directly back home. I decided that yard sales in the area were likely already picking up because of the threatening weather. Instead, I decided to go to Home depot and do some shopping.
I picked up a 2x12 by 10 foot board. I likely should have chosen another board, but this one had interesting knots through it. It is kind of difficult to dig into the stack for other interesting boards. The problem with this board was that it was cut by a circular saw and they made two passes about half way down the board. The blade cuts were not quite in line. I assume the tree was big and this was at the center of the tree as part of the center is in the board itself. That little difference down the center makes for interesting design opportunities on making the projects I intend to make them out of. The inset cut shows the quarter circle cuts of the back side of the circular blade. I had always assumed they used band saws to cut logs.
They had what looked like a 20 foot board on the bargain rack and I gave it long consideration. It would have been real cheap, but I decided there was no way I could handle it, either at full length or cut. That was just too much wood. Thinking back, I think I saw some green tint to some of the wood which would indicate that it was pressure treated, which is not proper for what I am doing.
When boards are cut, they are rough cut to the named size. The sides and faces are not finished in any way and you can see the rough saw marks on them. When you buy exotic woods, they will be first offered as unfinished. A one inch thick board is referred to as 4/4, which is 4 one-quarters of an inch. A two inch board would be 8/4s.
Now to finish a side, some wood has to be taken away from the dimensions as they plane away the surface roughness. They must go below the deepest gouge. They have a nomenclature for how many sides are finished (I forgot what that is right now) that dictates whether it is finished on one face, two faces, and/or two edges. On projects, you might only want one sided finished as something to base the rest of your measurements and cuts on, and leave the others rough as they will by necessity get different treatments.
I had wondered how I had gotten eleven pieces of square turning-blanks out of a ten foot board. I also wondered how my lathe, which can take 12" diameter maximum piece, can turn a 2x12 without requiring a perfect circle to start with. I decided to take some measurements before I started. I found that the board was just a hair wider than eleven inches, and about an inch and a half thick. And the board was 110 inches long. This board was finished all four sides and the corners had a slight radius.
To finish these surfaces, some wood has to be removed and that accounts for some of the dimension difference from what it is called and what it actually is.
Now I thought I heard somewhere that with construction materials, they allow for half an inch covering such as plaster board, for final construction dimensions, so a four inch wall will be 4 inches finished. A twelve inch wall will be twelve inches finished. At least that is what I thought I had heard. In that case, the dimension difference from what it is called would be understandable.
On the length, the 110 inch length is equally divisible by eleven ten times. Because the first measurement of eleven inches start at the far end of the first blank, one ends up with eleven blanks in the end.
I used eleven as my measurement and marked the whole length with the tape measure on both edges. This is actually easier than using the criss-crossing method I used the first time. I used a square to draw a line across at each point. The center of the board is much cleaner.
I then dug out the Saws-All and cut the blanks apart. Some were not cut quite straight, but that is not really critical. They were within the tolerances I chose to use. If it required accuracy, I would have used a circular saw or a table saw.
Once the blanks were separated, I sat down with a rule and marked the very center of each board on the rough side, and drew a radius. I would start with the finished edges and in three places to locate the center of the board and draw a line over the marks. I would then measure along that line and mark the center there.
I happen to have a center rule where zero is at the very center of the rule and then it is measured out from the center. On the other side is a standard rule running from one end. With the center rule, you simply match up the numbers on each side, then the half, quarter and individual marks so they are the same on each side. I think mine is to the sixteenth of an inch, and one could go to half the spaces in between the marks if more accuracy is needed.
If one does not have a center rule, one can do a similar thing. Find a number that is divisible easily by two. When the marks are similar on the beginning and end marks on the sides of the piece, the center number is in the center. No real math is required.
I am using a cheap plastic compass that uses a regular pencil for the stylus. I put the point on the center mark and then went to one of the cut sides (which tend to be a hair shorter than the finish sides) as a measurement and drew a circle around on the corners. Again accuracy is not critical as you will see why below.
The kerf caused by the two saw passes was off center from my mark which was on the thinner part of the wood. I was marking on that side as, at the time I was doing this, I had not figured out how to use my mounting system with the step in the wood like this. I am simply placing the board against the face of my chuck and using the point to hold it in place. With the kerf, the board would not sit against the chuck properly.
After I finished marking the corners, I went to the work bench and put each square into the vice and used the Saws-All to cut the corners off. I was able to do six blanks round. I have four more to do.
One of the boards has interesting knots in it, which brought this board to my attention in the first place. I put that blank away.
On a few of the corners I had the blade tipped sideways so the cut was on an angle. I simply ran the saw again and removed that high area.
I am running the Saws-All with the blade upside down. The Saws-All has a handle and most of the machine’s foot is on the handle side of the machine. If you put the blade upside down, The blade is then closer to the top of the machine and there is a lot less machine beneath the blade. This allows you to get to a flatter angle to the work. It makes it easier to start a cut if you are cutting on the surface and also to cut straighter with the blade and machine aiming more in line in the direction you want to cut as you lay it down. If in normal, the saw has to be mostly perpendicular.
On these corners, I am cutting straight up and down, but I found that if I follow the line with the crack caused by the two halves of the machine’s casing, the blade does a pretty good job of following on the line you are cutting. Since all I am after is to make the corners small enough to spin in the lathe, If I am even near the line, I am good. Since the boards are eleven inch in diameter, I have a whole half inch extra space to work with on any corner.
About the time I was finished with my rounding of the six blanks, It dawned on me I have two possible ways of removing the step in the surface of the wood so I could turn it with that side against the chuck of the lathe. One way is to run it through the surface planer. The problem with that is that it is buried near the back of Mom’s garage.
Then I realized I could mount the work on the lathe, round the edge, true the surface with my tools, then I can easily flip it around for the surface I am after.
With this board, the pith of the tree runs through the center of the board at one end and rises to just above the surface at the other end. With the pith inside the wood, I will likely get an oval pattern when I turn them whichever side I choose as the top. I will get normal patterns where the pith rises above the wood. I expect rather interesting patterns out of these boards. Some surfaces have some cracks in it. It will be interesting how the wood will react as I remove the surface. I will plan to remove wood to eliminate the worst of the crack when possible.
I was surprised there was no weather on us, in spite the towers all around. I finally cleaned up and headed inside, to rest with my feet up. I really needed it.
While I went to Mom’s on Sunday, I did nothing other than cutting off one corner of a blank. Because of the high humidity, I decided that sitting in the shade and talking and nothing productive was more interesting than accomplishing anything.
I am staying home on Monday the fourth, and have some projects around the house to do so nothing worth mentioning will happen then. I might look out the window and watch some fireworks, or go to be extra early. I will have to see.
Next weekend, I hope to do some turning. I figure I will make another platter or two. If the weather is kind of questionable, I might leave the lathe under the awning and finish some of the platters I already made. I had picked up some finishing disks (sandpaper disks and a holder) that I can use in the drill. When you hold a sandpaper to a spinning piece of work, it will leave long scratches. One usually moves the sandpaper side to side real fast to even the worst scratches out.
With the plate spinning and the sanding disk spinning, the swirls of the sandpaper gets blended in, Some are going up, some going down, some going left and some going right and some on angles. They even out until they are unnoticed. Some of the platters I have made so far need some extra cutting to clean them up and get them right, before I even consider sanding. One does not want a whole pile of sawdust under the awning as cutting a whole disk would create. That sawdust gets beneath everything and one has to move other equipment out to get to it. this light type of work won’t create a lot of sawdust.
I will have to see what I do next weekend.
2351

one side of the 2"x12"x 10'-0" board

The other side of the 2"x12"x 10'-0" board

showing the curf caused by the second pass of the saw blade

front view of the Rapunzel doll

side view showing long hair

rear view

showing her ceramic feet
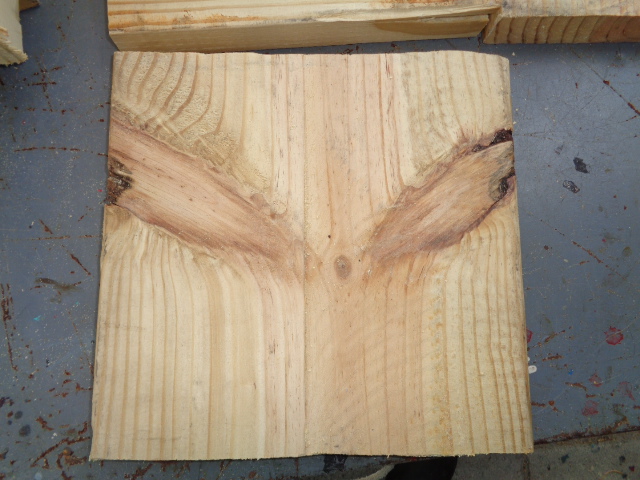
the interesting knot pattern in the wood

the back side of the knot pattern

a couple other knots on some board

the squares of the wood.

the interesting patterns in the wood I have collected
The round one looks like the grey alien
The upper square has a rabbit drawn on it.
the lower square is the new board. It has possibilities.
No comments:
Post a Comment