(January 17, 2000 was my first carving day.)
02-20-16 Saturday
64 degrees early morning, 75 in the afternoon, nice brisk wind, with surprise gusts that tug hard on hats. They said it was supposed to be broken clouds, but they must have repaired them before dawn as, the puffs were side by side, stuck together, with no blue. In the afternoon, their glue failed and the puffs separated and one could see bits of blue sky between a few of them. This weather report is brought to you by the City Of Pompano Beach Department Of Tourism.
THURSDAY
The Gold Coast Wood Turning Club Meeting met together. We had a visitor who, at the end of the meeting, said that we were the friendliest club he has been involved in. That is always nice. We have not developed cliques between members and all the advanced people are excited to help the beginners. They could even help me if I let them.....
I arrived early and a high-school electronics club was building a wheeled robot that could also fire basketballs. When I first worked in, they could not get it to work and thought that adding a gyro would help. I left for about half an hour. When I returned, they just started testing it. The wheels had bearings on an angle all the way around. Front and rear wheels had opposite angles. When the wheels spun, the car could move sideways. The direction it moved was based on what direction each wheel spun. It could go straight too. It was interesting to watch. They even tested it driving over a small barrier. I assume that they will compete with other schools or clubs.
The club demonstration was on carving spirals in your work. His methods of working were effective, easy, and logical. He had made a thin plywood plate that fits around the shaft of his lathe that has 24 evenly spaced holes in it. He had set the holes in the place to fit a jig that was set on the top of the lathe head and he stuck a drill bit into each hole to hold the plate in position as he worked. With the chuck tight against it to hold it in place, This became an indexing plate. He also made a small piece of wood to fit in the tool rest socket.
He simply took a large compass and stuck the point into the center of the piece of wood in the tool rest hole and would draw an arc on the work. He could adjust the distance and angle to get the curve exactly the way he wanted on the work.
Another method he used was to use his tool rest to draw a centered line along the length of the work at each stop on the indexing plate on the work, He then rotated the piece to draw some lines around the piece. He then took a piece of cardboard, or paper, or even free hand, and drew a line that met each intersection of the lines going around the piece to create a rough curve.
With these layout lines, he would then use one of several tools, such as a Dremmel style tool, to carve in the lines. Of course, the lines will be rough because the tools jump and weave. He then used sanding disks that he slipped into the groove to even up and clean up the lines. He would also use round rasps and files to finish up the lines. He made wood holders for sanding disks that allowed him to sand in the work too. Sometimes the sanders were on the power tool he held, other times they were in a drill chuck on the lathe and he held the tool against it.
With these spiraled lines, one could just make decorative surface cuts, or could cut all the way through. He suggested that if cutting through, don’t go all the way to the bottom or through the brim, as the piece becomes easy to break. It also makes it hard to finish the bottoms, as one usually still has an unfinished tenon on the bottom to hold it while you work when cutting the grooves.
When you do a whole lot of wood turning work, you end up with pieces that are waiting to be finished or just not worth finishing. Several of the pieces he demonstrated on were “pieces of wood laying around.” Many were as good as my best works........... It is much like on TV, they use a piece of“scrap” wood to make a pattern or a jig where most of those scraps of wood are my best pieces.
We have an Instant gallery display each club meeting, where people place their work out to be viewed, and one can pick a piece up and examine it. Later in the club meeting we have a show and tell and each worker tells what the work is and how they did it.
I put my first angels out. A woman walked by before the meeting and said, “Look at the cute angels!” That really made my day. She recognized what they were!!!!!!
SATURDAY
Part of the fun of yard sailing, is the anticipation of finding something special. Then, it is the fun to see what they have, and finally getting a little goodie worth taking home. One yard sale had a sign that said, “PRE-LOVED ITEMS FOR SALE.” That says it all for yard sales. When you are giving a sale, you are passing on things you no longer need to keep. You are also getting a little something for it. The person buying them are getting something they think they can use or need for a good price. They mean more to the buyer if they pay something for them.
I have some items on my wish list that I am keeping my eye out for. There are types of items I am looking for as gifts or as “can use.” Finally, there are items that, When you see them, you realize you always needed or wanted them but never knew it until you saw them.
I did not spend much money and did get some things I can use. One thing was some templates for lettering. There was a office tape dispenser and some colored pencils.
There was a condo that periodically has yard sales. I got a dollar worth of stuff there. I loved some of the furniture they had, but I have no need for furniture. They also had some “I already have too many” items.
At the different yard sales, there was so much stuff that I would look at and think about the possibilities on. I hate it that I do not need collectibles. I hate it that I don’t need decorator items or severing sets. I also hate it that I have no place for cute toys.
This is the time of year where shopping is good. If you were setting up your first home and you have some money, with patience, one can furnish a nice home for a fraction of the money you normally would spend.
I saw some wood working tools that were well aged. If I get tools, I want to use them, not put them on display. It happened that I had enough of the kinds of tools they had on display. I was ten seconds late on a air brushing compressor with air brush. A guy got it to before me. The price he gave was good. The man tried to negotiate but the seller was firm on his price. The man also had a router finger-joint jig that was nice and at a good price but I am not doing furniture and I really want is one that I can change the spacing of the finger joints (Like Norm Abrams of The New Yankee Workshop had). All that are available commercially use one space setting.
We went home, then went out to Home Depot to get something for Mom’s backyard project. The load was just behind the tailgate. My old trucks would have rode like a small boat in the water. With this truck, I just barely felt a slight difference in how it rode.
I helped mom take the loads to the back yard and place them. Working together was not too bad for either of us. Now she can work in the back yard on this project whenever she is ready.
After a quick nap, I went out back and set up the lathe. I was in the mood to try something large. Ornaments are nice, but sometimes one needs “real meat” to work on.
Years ago, I prepared some two by ten and two by twelve yellow-pine boards for turning. Some I just knocked off the corners, and others I cut round on the bandsaw. They have been in a basket beneath my tool cart for several years. I took one board out that was fairly round and decided to work with that. It had some knots I knew would look good on a platter. I LOVE yellow pine dishes, especially with knots. Yellow pine, with the ring patterns, is not boring. I would not mind a whole room paneled with that stuff.
This time, I chose to use my sanding disk as the drive for the wood disk. The sanding disk is fairly true to the spin. I located the center, then put the point of the tail stock into the center and pressed it against the sanding disk. It took me a few tries to realize that the disk of wood I was working with was not a truly round. There was a high point that was throwing me off. Once I figured that out, I simply turned cut the edge until it was round, then worked on the surface. .
The knots were more better looking on one side than the other. The problem was there was material missing from the “best looking” side and I figured it might create a problem for the shape as I might not go deep enough to get past the missing chips. I flipped the board so when finished, that while the knots would not look quite as good as I had hoped, the surface would be nice..
Since I had sharpened the bowl gouge the last time I used it, it ate wood nicely. Saw dust and shavings flew everywhere. The shavings that hit my arms and above the collar of my shirt had a nice warmth to them.. I was testing all the stuff I knew about wood turning. I was still doing a few things wrong, but did much better than in previous years. I have some more muscle memory to build, but some of it was coming back. I never got a catch in the work and my cuts were smooth and clean. I liked that.
I saw a program this week where they did some wood turning. The master craftsman said that, “If you think your tool is getting dull, you should have sharpened it ten minutes ago.” Sharpening or honing is important to get a nice clean cut. As the tools get duller, you have to apply pressure to get the same kind of cut. You really should be able to work with one hand holding the tool, but using the second hand for fine control. You should not be bearing down on the wood with all your might.
I had measured the base of the plate so that when my chuck was opened fully, it whould fit inside with no play. I mis-measured badly. The chuck would not fit inside. I did find that it did fit outside, but that was not what I wanted. I had to re-mount the piece to improve on the base of the plate and it was a bother to get the work centered properly.
There are natural stresses in wood. When you cut wood thin, it will twist and warp depending on what direction the grain, rings, and radials are in the wood. In making these platters, you are removing wood that helped the board remain straight and true. The stresses are released and the wood will bend and warp a little. It is worse if the wood is green, not the kiln-dried wood I was using. It is common for a vase or bowl made out of green wood to become oval. Many wood workers will rough turn a bowl in green wood, leaving it an inch or two thick, then let it dry for six months to a year. Then they will finish turning the dry wood, removing the oval shape and making it round. The extra wood in the thickness allows for the oval to be canceled out when finished turned. There is a formula for the thickness to the size of the bowl when drying.
When I finally turned the piece around, there was a wobble in it and I could not quite get it centered properly,. I chose to remove the tail stock point and put in a ring so I would have more leeway on centering it.
As a last resort, I hit the platter on the high side and it moved. I tried it again. It was centered to an acceptable amount. I tightened everything and got to work on the inside.
I was not as confident with my work on this project, as it has been a long time since I had made a platter, so I made the platter a bit thicker than I prefer. One does not cut through if you leave it a little thick. There are some things about the shape I would have done better also and could have fixed by going thinner or planning better.
I still have to cut off the nubs and grind them flat, and there is a whole lot of sanding that needs to be done, but I am quite satisfied with the platter I made. Because of the knots, this platter has a nice pitch scent. A coat of varnish or oil will seal in the smell, but for now, it smells great.
It is surprising how much sawdust comes from a simple platter. In reality, you are taking a two inch thick board like I was using, and are actually slicing away an inch and three quarters or more of wood to get a platter that is good.. I think this was a ten inch diameter board. That ends up to be a whole lot of wood that becomes sawdust. Luckily, Mom uses it for mulch many times. Right now it is on top the sand pile and will become part of the soil there.
With all the time on my feet and “running around”, along with the backyard project and the wood turning. I was well done in when I finished cleaning up the work area and putting everything away. I napped the rest of the day, and tried to recover, before it was time to leave.
I will see what I do tomorrow. Sundays tend not to be very productive days as of late.
NOTE: (When I got to Mom’s on Sunday, we went out for lunch and that killed the day. There was nothing else to mention for the day.)
I will have to see what I do next week.
2586
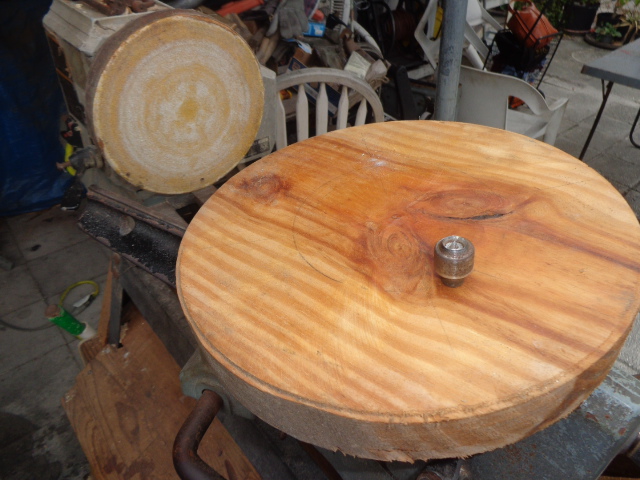
One side of the disk, showing the point I was using and the sanding disk to backup and drive the work.

the better side of the work. Two of the knots had divots in them.

The back almost done

The sanding disk backing the platter.

The front almost done.

The chuck backing up and driving the work.

The nearly finished front. The nub has to be removed and ground flat.

The bottom, the nub has to be ground and made flat.
Love the look of the wood.
No comments:
Post a Comment