Monday, September 30, 2013

Year 14, Week 36, Day One (week 683)

Year 14, Week 36, Day One (week 683)
(January 17, 2000 was my first carving day.)
09-28-13 Saturday


    82 degrees in the morning, 89 in the afternoon, loads of puffs and towers, some blocking the sun for a short time, stiff breeze kept it feeling cool. This weather report is brought to you by the City Of Pompano Beach Department of Tourism.


I figured out this weekend that the real pleasure of yard sailing is not, finding things you need, or finding things you want. It is actually finding things that you did not know you needed or wanted. You see something and know it is what you are really missing. 
In yard sailing this weekend, I did not spend too much money. At one yard sale, I picked up a bundle of 76 chop sticks, a see-through ruler and a triangular architectural scale, and a plastic compass that uses a standard pencil. All that for dollar fifty.
At another yard sale, I picked up two boxes, one had foam, rubber, and plastic stamps and ink pads. I also got an embossing kit with anvil, hammer, letter stamps, and disks. all for five bucks. 
The embossing kit forced me to dig into the shed to get two letter sets I had. The new one is a size between the two I already had. Mom has a need for these to make metal tags (using some sheet metal flashing I got last month) for her plans so she can remember what they are.


Since I got all those chop sticks, after I photographed everything, I counted how many sticks I had and looked at the condition. I assume that the sticks were all used once for dinners. 
I figure I can "destroy" them in any way I wish. They will be used as Crochet hooks, dowels, rods, and anything that meets my needs. I happen to have a couple boxes of chop sticks at home so making use of these don't bother me one bit.

I had eight round chop sticks (Japanese style) and I immediately shaped the handle end and cut in the slot to make them into crochet hooks. I got mostly "I" sized hooks, but a few "J" sized hooks. The chop sticks are not all bamboo. Bamboo is excellent for crochet hooks. It bends and breaks with difficulty.
I messed with a couple small ones, trying to knock off some corners. They were not Bamboo and they broke easily. 
As mentioned before, many of my other chop sticks will also become crochet hooks. They can also be used as dowels to connect two pieces of wood together. They will all be used over time.

I have several sized cast iron pans I use regularly. They are usually stacked on one burner of my stove when I am not using them. I decided to make a cup-hook rack to hang them next to the stove but off the surface. 
While getting the letter punches out of the shed, I ran across a package of hooks of various sizes. Later I picked up some larger hooks at ACE HARDWARE. Mom purchased it for me. She told me that she thinks they are a tiny bit big for my Christmas ornaments....
Looking around for some wood, I found a piece of Basswood board that had some cracks running down the center. I cut on the cracks, which was not exactly straight. The wood was rough sawn at the saw mill and had been laying around for a couple years. It was well covered with aged sawdust. 
I used the disk sander on it. I did not get all the saw marks out, and I did not get it absolutely straight and square. I drilled fine holes into the wood for the screws and put in the cup hooks. I over-turned one cup hook and it broke. the end did not come out easily so I left that in. 
I will claim that it has a "RUSTIC" LOOK..... rather than looking lazy and sloppy. 

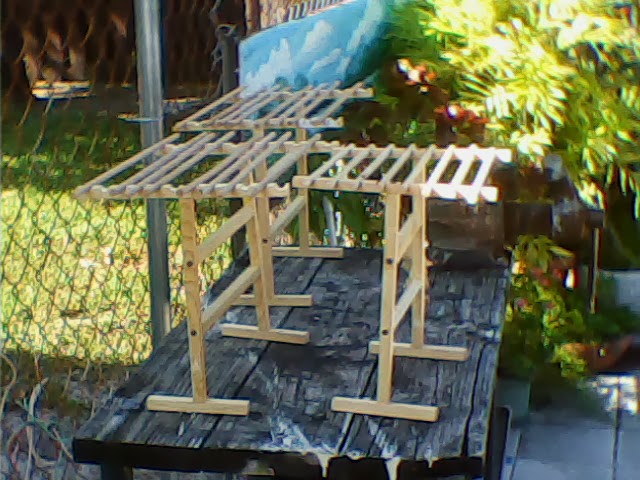
The dental molding I am using for pasta drying racks were missing a dental. I solved the problem with wood and glue.
One I had glued the damaged strip of dental molding top down on a stick and then sanded off the damaged pieces between the dentals. the count was off. I glued another dental onto it and clamped it tight to dry. Later I sanded off the wood backing so it was even with the others. 
On the other one, a dental was missing, but it was the end of the stick. I had a couple chop sticks where they were made from one piece of wood and were designed to be split apart to be used. I cut the solid back off the chop stick, then made a half-lap joint between the dental molding and the chop stick so the top would be flush with the bottom of the gap that was sticking out. I then took my remaining piece of dental and glued that on upside down and then clamped it tight with a backer piece. I filled the spaces with glue, let it dry, changed the clamp so the backer piece was gone and the clamp applied the full force on the "sandwich" of wood and then let that dry. The result seems very strong. It does not look great, but should work fine since I don't see great forces on these.

We went to the Chinese buffet and that killed some of my working time. Any reduction of food I may have done all week, and will do this next week, was completely erased with that one meal. 

My back complained about bending over on Thursday at the grocery store and it still bothered me this morning. My wrist was acting up and so was my leg. By mid day, though, my back stopped hurting and my other bothers were sometimes unnoticeable. When I started packing up to go home, that was when my back started bothering me again. I had some back damage in the accident and it has been doing well simply because I have been extra careful and have avoided really doing anything. I am not totally sure what it is but for some reason, packing up after a day of projects is hard on my back. I need to look at what I am doing to see what is causing it.

I have a number of projects to work on tomorrow. I will have to see what I actually accomplish.


Year 14, Week 36, Day Two (week 683)
(January 17, 2000 was my first carving day.)
09-29-13 Sunday

89 degrees, puffs moving around quickly, strong breeze to make it feel cool. This weather report is brought to you by the City Of Pompano Beach Department of Tourism. 

In the morning, I decided to put up the pan rack I made. I quickly realized I made a slight tactical error in the design. the holes the mounting screws are supposed to go into should actually be larger than the screw so all screwing force is into the wall rather than moving the screw through the wood of the board. I had used a fine bit just to give a tiny give in the wood as the screw went through and to guide the screw straight. 
I searched for the materials I needed to do the work. My FORDUM motor tool has a chuck that would hold the drill bit I selected, but I could not find the chuck key anywhere. A little battery powered motor tool I have just did not have the guts to do the work. I located an electric drill and that did the job. I drilled out the holes so that while the hole was still too small, it make screwing through it much easier. The pans look natural hanging there now. they are right next to the stove while out of the way. 


I stopped at a yard sale on the way to Mom's house. OH MY GOODNESS!!! I found a knee brace in the style of an unloader brace, where it forces the knee straight. It is exactly what I was attempting to design and build several months ago, but did not have the working technology to make it work. What is more, It only cost me $2. 
It took a little bit to figure out how to put it on. I got it on and was walking around with it just before Mom got home. I had it on the outside of my clothing so I could get a feel for if it was going to work. It encases almost my whole leg. 
We went to the Festival Flea Market, which is on Sample Road next to the turnpike in Pompano Beach. It is a large mall filled with tiny little flea market vendor shops. There are also some larger stores in there including an Antique mall Furniture stores, food court, a Farmer's market. My favorite store is DOLLAR AND UP. It is almost like yard sailing, as it has wonderful things, just like a yard sale has. There are two sites, one is a big store and the other is a medium sized booth. they are operated by the same people but have some different selections. If you cannot find it at one, you can find it at the other, sometimes. 
With the new brace, I walked the mall from about half way to the end and back. My leg itself did not do to bad. The brace, though, pressed into my leg at a couple places. I have to work with it and figure out padding and settings to make it comfortable to wear all day long. There are problems with having it outside the clothing, but those problems will be cleared up after I work out the setup of the brace. 

I finally got to get outside. It was already getting late. I cut the sticks for my pasta drying racks. One of the tools I dug out when I looked for my letter punches was a jig saw attachment for a drill. It just happened that the dental molding is longer than can fit in my band saw so I put the jig saw attachment on the drill and cut right through the wood. It would have been better to clamp the board down so I could hold the drill with one hand and the jig saw with the other, but instead I used the stick to keep the jig saw from spinning on the drill. 
This time, I sanded all the pieces, squaring the ends on the disk sander. To do that, I eyeball it square to the sanding disk, touch it, then rotate a quarter turn and touch it again. Usually two or three full rotations will square up the ends nicely as each time it goes up against the spinning disk, it is flattened top to bottom. That evens out any angle errors. 
Since in was late, I decided to not try to do the prep-work for assembling the drying racks. it will be a quick project next weekend. 

Just before Mom asked to go out to the Festival Flea market. I was trying to tip the table of the table saw on a 45 degree angle. I had cut blanks for Christmas Ornaments but wanted to put it on a 45 degree angle to cut for the fish ornaments. I have to figure out how to tip the table as I need to lop off some wood  with the stick at a 45 degree angle. The way I have been doing it is dangerous and was trying to find a safer way to do it. tipping the table of the bandsaw might be the way to do the project safely. 
I just now wonder if there was a pin or something on the opposite side of the angle control that needs to be pulled to tip the table. I will work it out next weekend.

I have loads of projects to work on next weekend. I will just have to see what projects will get priority. 

I will see what I do next weekend.


 Metal punch set with chains and disks


foam stamps 


 wood mounted rubber stamps

 plastic lid mounted stamps with inc and some shaped punches

chop sticks, triangular architectural scale, clear plastic scale, plastic compass that uses a pencil.


 alphabet punches, top and bottom ones I already had, the middle one (shiny) came with the metal punch set.


 76 chop sticks


 round chop sticks made into "I" and "J" crochet hooks


sandwiched wood to add an additional dental to the stick.  


 "rustic" cup hook strip for pans


"Rustic cup hook strip in place with pans hanging on it.

leg brace opened up


brace on leg my leg I have to figure out how to adjust it properly

Monday, September 23, 2013

THE SHADOW LEGION: NEW ROADS TO HELL (BOOK REVIEW)

From Airship 27, cover by Mike Fyles
Hello Everybody.
Recently I had the honor of being Ric Croxton's guest co-host on episode 77 of his Ric's Comics podcast.
You can listen to that here, and the topic of discussion was The Shadow Legion: New Roads to Hell by Thomas Deja.
While the podcast was spoiler free, what did I actually think of the book?
Well...

In her final days, a woman makes a desperate bid to survive and becomes a growing menace to innocents and criminals alike. Now the criminal Rose Red, she will obtain her goals and stay alive, no matter how high the body count rises.

In his debut novel, Thomas Deja brings together a diverse quartet of mysterious beings to combat a threat to the city of Nocturne, Florida.

While the Black Talon was already an active character at the start of the novel, his girlfriend reluctantly uses the code name Dream Catcher when in public; because she does not really consider herself a crime fighter. However Night Breaker was just a character on a radio show and the person who becomes The Ferry Man had no heroic aspirations at all when the story begins.

Yet these four people wind up being the only ones who are able to stop Rose Red and restore order in Nocturne, although their adventures are far from over at the end of the first book.

Out of all the characters within the tale, the Ferry Man bears watching, and I felt sorry for poor Isaiah Copper even before the cataclysmic events that dragged him into the battle with Rose Red. The villainess her self was unique not only for the pre-World War Two time period the first adventure is set in, but her initial choice of weapons (her 'thorns') was totally appropriate.

As revealed in the podcast, Deja has long term plans for the characters. While most media today is a combination of both words and pictures, he does an excellent job of not only conveying the action and drama in just straight prose, yet delves into social situations that unfortunately existed back then, but are hopefully better today. Overall, a good and recommended read for people looking for something different with their superheroes, or mystery men and women.

I look forward to future installments and adventures of the Shadow Legion.

Published by Airship 27. Cover art by Mike Fyles. Interior illustrations by Chris Kempler. Available through Amazon or the publisher.

Sunday, September 22, 2013

Year 14, Week 35, Day 0ne (week 681)

carved figurines, A penguin on the left and a marlin (sail fish) on the right.


Pasta drying racks. The one on the right  is smaller except in height and used dental molding to hold the rods.


 My drill press using a regular drill.  It is actually quite good.


gluing the tops of dental molding to a stick with the plan of cutting or sanding away the existing backing. The stick being glued is to the right. the stick to the left  is just to allow even pressure all along the length.


A closeup of the clamping and dental molding. In this case the glue surface is to the left.


 The finished stick of glued dental molding after the rough base was removed.


 New wheel on wagon. Opposite wheel broke while putting the wagon back. I guess I have to replace all four.


 Some figurines I picked p at a yard sale. The guy also had unicorns but held off on them.


Cast iorn fry pan with wooden handle. It had some surface rust. I cleaned it up and this is after I gave it a light seasoning and used it once. I will use it for a while to give it a real good seasoning.


Year 14, Week 35, Day 0ne (week 681)
(January 17, 2000 was my first carving day.)
09-21-13 Saturday
   
    86 degrees at nine, 89 at two, blue sky to the east over the ocean, puffs to the west over the Everglades. A good breeze kept things nice. This Weather report is brought to you by the City Of Pompano Beach Department Of Tourism.

The mocking birds have started singing again. You cannot get a better singing bird than them. I can listen to them all the time. The variety of their songs, and between birds make them the ultimate singing birds.

We hit three yard sales and I somehow left all of them without buying anything. I had seen something I wanted to get as a present, but it turned out to be part of a set and I did not need the rest of it.

I had a number of projects in mind. The big one was to make some pasta drying racks. I had done most of the preparation for the project last week. Today was the cutting and assembly.
For the screws that went through the sides of the sticks, I used a larger drill bit than the screws I was using. This would allow the parts to rotate. Some did not need to rotate, but I did the same thing for them anyway.
I also used a tiny drill bit to drill into the ends of each stick that got a screw into them. This aided the screw entering them, prevented splitting of the wood and helped me get the screws to go in straight.
On the side pieces, I also used a very big bit and countersunk the holes by hand so the screws would not stick out. This was especially important for the feet so they could sit on the counter flat.
The hardest part was to decide how big the racks would be. My main decision was to cut the three foot long sticks in thirds and that gave me the height and the width of my first two racks.
I found that I need screwdrivers with larger handles as the ones I was using was really wearing out my skin as I could not get really good force on the screw. I would have used a drill or battery powered screwdriver but I could not remember where my bits were and was too lazy to look for them.
My first two racks used the rod holders I made last week, where I clamped two sticks together and drilled between them on the edge.
Later in the day I went to HOME DEPOT and picked up some more rods and sticks. I made a third rack and I used the Dental Molding I had purchased a couple weeks ago. When I made the other ones, I realized that I really should have cut some of the sticks in quarter rather than thirds. This third rack was made at the same 1 foot high as the others, but all the rest of the sticks were at 9 inches, a quarter of the three foot stick. Part of the reason I did this was that the piece of dental molding I was using was not as big as the rod racks of the other two. I went with the foot tall because noodles can easily be that long.
I still have sticks and partial dental molding that I can make use of.

Between the racks, I carved another penguin. I was getting close to finishing when I lopped off the arm. One problem of carving in WHITEWOOD is that it splits easily and delicate parts disappear faster than you would believe. I glued the arm back on and set it to the side. Later, after the glue dried, I carved more on it and decided to let it set for when I do the finishing carving on all the penguins.

I decided to experiment with a possible second carving design. It was suggested to me a few times and fits for down here in Florida. I took a four inch long stick and cut some of the corner off on one end, then the opposite corner on that end. I then turned the piece a quarter and removed those corners so the piece was twisting.
I then kept shaving and shaving until I had a nice fairly flat twist. I also started shaping the head end of the stick based on memory of what a MARLIN (A sail fish) looks like. I started splitting off a fin so I glued that back on and let it dry. Later I did more carving on it. I have more clean up but it came out pretty good so far. Everybody will know what it actually is once I paint it.

I finished working at about three. Both of my wrists bothered me as they both got a real work out between carving and driving in screws. I was seated all day long so my leg gave me just the normal bother when I first got up.

Tomorrow, I hope to work on more pasta drying racks and carve some more figurines.


Year 14, Week 35, Day Two (week 681)
(January 17, 2000 was my first carving day.)
09-22-13 Sunday

90 degrees with good breeze, interlocking feathers to the east over the ocean, building puffs to the west over the Everglades. The puffs started building bigger and bigger as the day wore on. This Weather report is brought to you by the City Of Pompano Beach Department Of Tourism.

I got kidnaped by two yard sales, one going to Mom's house and the Other on the way home. going to Mom's house I got some figurines, some are refrigerator magnets. Most are some form of dragons.
The one on the way home netted me a cast iron fry pan with a wooden handle. It had some surface rust as it did not have any seasoning. I gave it a very light seasoning and then used it to cook dinner. I will use it for a while until it is properly seasoned. I will likely gift it to someone who will really enjoy it. I do like the wooden handle, though. Nice to handle it. The eye hook on the end is what keeps the wooden handle in place. I found out that the eye hook is basically a threaded rod that goes into the pan where it meets the wooden handle.

When removing the dental molding from the cornice piece I had purchased a couple weeks ago, some of the glue was stronger than the wood and the wood split on an angle when I was trying to separate them. Some of it was unusable as it was not strong enough to take light abuse the pasta racks might take. I applied glue to tops of the dental of the dental molding and applied it to a stick I got yesterday. I put another one on the other side to allow me to apply even clamping pressure. I used a number of clamps to make sure I had good pressure everywhere. I set that to dry.
I later un-clamped it, used the bandsaw to remove the worst of the old wood, and then used the disk sander to bring it down to where the wood between the crowns came off. It looks good. They should stay on nicely. I consider that one of my best glue jobs. I did a lot of measurements and decided to wait till next week to make more Pasta Drying
Racks.

I was planning on turning some wood. I even cut a piece off a branch my brother gave me from his Live Oak Tree. I looked at the wooden wheel I made and decided to put that onto the wagon I made it for. I was not going to put the rubber tire on. That, I think, requires boiling water and gloves to get it to stretch enough to fit.
I broke off the rest of the wheel. the part around the axle was good and strong. I ended up using a dremmel to cut the plastic off the shaft and then it took a lot of prying to get it off.
My next project was to get the end cap of the axle off. It took some pounding. After trying different methods, I took and set an ax blade against in and hammered on the flat end of the ax. That finally drove the cap off so I could put the new wooden wheel on. I did some guesses of how wide the wheel needed to be to fit. I sanded off a bit more than I needed so there is more play than needed. I also guessed on the right size drill should be used for the shaft, going a bit bigger. Smaller would have been better. I got the wheel on and figured it will work for a while.
I was pushing the wagon into the hole it came out of next to the band saw and the opposite wheel broke!!!! I see now I need to replace all four wheels. That will give me a good lathe project in the next couple weeks.

About the time I had done those projects, I had enough for the day. I cleaned up, which putting everything away is a project itself.

The Marlin needs some clean up to be presentable. It will also need paint. I still have not decided whether to do them as a series. If I can bandsaw the corners off it will make my project easier, but I need a safer way of handling 45 degree angles that the two by twos have to be. I might try setting the bandsaw table to 45 degrees. Then the stick will think it is laying flat on the table.

I have a number of projects to work on next weekend, some have been sitting for months.
I will see what I work on next weekend.